Articles in this topic
Site name, menu and footer
Set your website's name and logo, the links in the menu bar and footer, your social media, and the texts search engines show.
6 min read
Some things appear on every page of your website: its name (or logo) at the top, the menu bar, and the footer at the bottom. You set them once, here, together with the texts that Google and other search engines show about your website.
Your website's name
The site title is the name at the top left of every page of your website. The editor shows it at the top left too, so you always see which website you are working on.
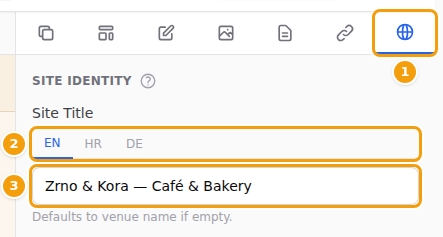
- In the side panel, click the Site tab (the globe, the last icon) (1).
- Under Site Identity → Site Title, click a language tab (2) and type the name for that language (3). You can leave it empty: then your venue name is used (Defaults to venue name if empty.).
- Scroll to the bottom of the Site tab and click Save All Settings.
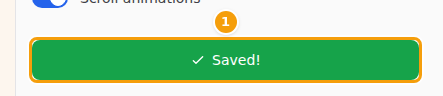
The button turns green and says Saved! — your change is in the draft. Guests see it after you publish.
Tip
Most restaurants use the same name in every language: then simply type the same name in each language tab. See Languages.
Your logo
When your venue has a logo, the website shows it instead of the site title. You add the logo outside the website editor:
- In the menu on the left, click Venue Setup, then Configure on your venue.
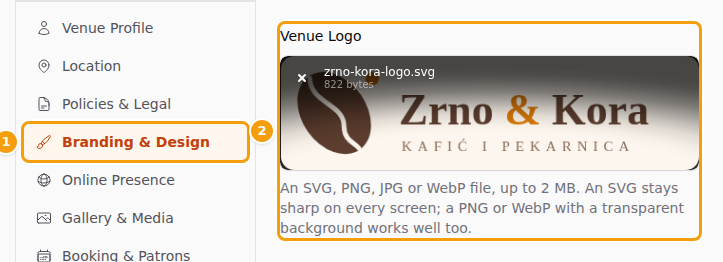
- Click Branding & Design (1).
- Under Venue Logo (2), drag your logo file onto the box, or click Browse to choose it.
- Click Save Branding at the bottom of the page.
Good to know
Your logo is not part of the website draft: guests see a new logo as soon as you click Save Branding, without publishing.
Tip
You can upload an SVG, PNG, JPG or WebP file of up to 2 MB. A logo in SVG format stays sharp on every screen, so ask your designer for an SVG file if you can; a PNG or WebP with a transparent background also works well.
The menu bar
The menu bar at the top of your website lists your pages automatically — you don't need to add them. Your site title or logo (1) takes guests back to the home page. Extra links you add (2) appear after your pages.

To add an extra link — for example to your online shop, your gift vouchers or a delivery service:
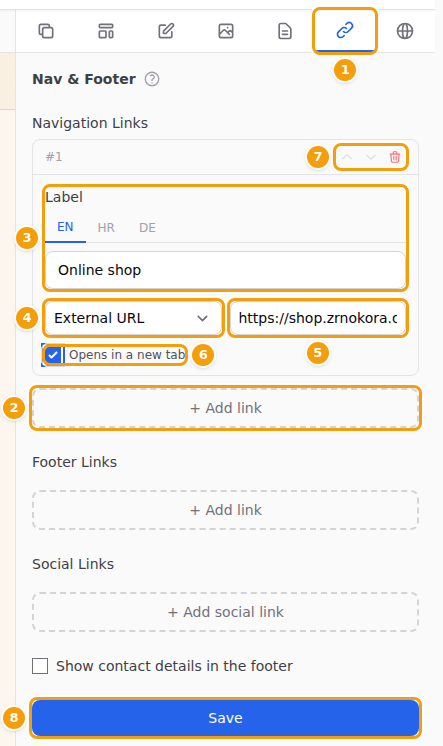
- In the side panel, click the Nav & Footer tab (the chain link) (1).
- Under Navigation Links, click + Add link (2). A new, empty link appears.
- Under Label (3), type the text of the link in each language.
- Choose where it goes (4):
- External URL — another website. Type the full address (5), starting with
https://. - Internal page — one of your own pages. Choose the page from the list.
- Event (its own website) — one of your events. Choose the event from the list. The link opens that event's own website, and it follows the event if its web address changes. If the event is deleted or its own page is switched off, the link is left out of the menu automatically.
- Series (its own website) — one of your event series. Choose the series from the list; the link opens the series' own website. This choice appears only when your brand has event series.
- External URL — another website. Type the full address (5), starting with
- Tick Opens in a new tab (6) for links to other websites, so your website stays open for your guests.
- Use the arrows to move a link up or down, or the red bin to remove it (7).
- Click Save (8) at the bottom of the tab.
Good to know
You can add up to 8 extra links. To rename a page in the menu or change its order, change the page itself. See Pages.
Tip
A link to one of your events? You don't have to add it here yourself: click + Add Page, choose Start with → Single event, pick the event and click Add to menu. The link appears in this list, named after the event, and you can rename or remove it here. See A link to one event in your menu.
Footer links
The footer is the strip at the bottom of every page. It shows your footer links (1), your social media (2) and, if you want, your contact details (3). At the very bottom there is always a small Clava line (4).
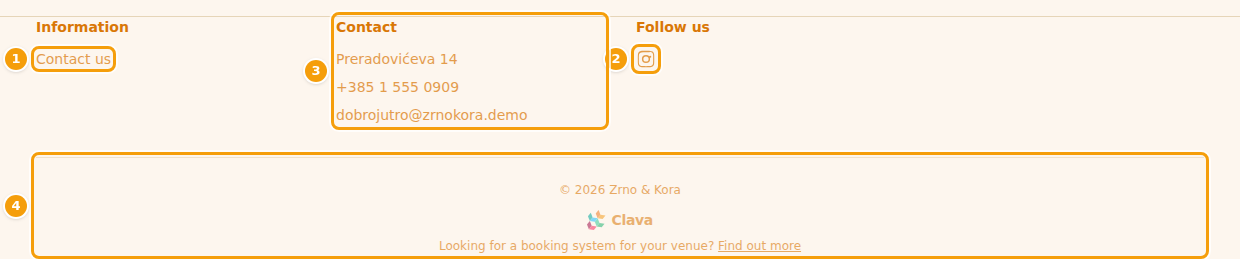
Footer links are a good place for your allergy information, your gift vouchers, or a contact page.
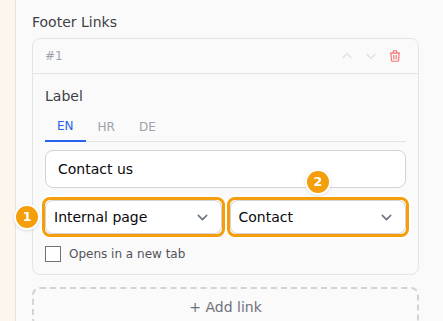
- In the Nav & Footer tab, under Footer Links, click + Add link.
- Type the Label in each language.
- Choose External URL, Internal page, Event (its own website) or Series (its own website) (1), then the address, the page or the event (2).
- Click Save at the bottom of the tab.
Good to know
Can I remove the Clava line? No. Every website made with Clava ends with your name and year, the Clava logo and the line Looking for a booking system for your venue? Find out more. It can't be switched off or changed.
Social media and contact details
- In the Nav & Footer tab, under Social Links, click + Add social link.
- Choose the network (1) — Instagram, Facebook, X, TikTok, YouTube, LinkedIn, Pinterest, WhatsApp, or Website for any other link.
- Paste the full address of your page (2), for example the link to your Instagram profile.
- Tick Show contact details in the footer (3) to show your address, phone number and email address.
- Click Save (4).
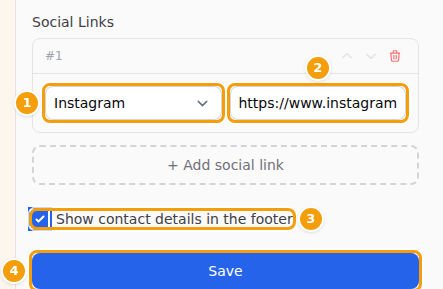
The social media icons and contact details appear in the footer of every page.
Tip
The contact details come from your venue: Venue Setup → Venue Profile (phone and email) and Location (address). Change them there, and your website follows — without publishing.
Social links in a Social Media section
Your social links are kept in two places, and each one feeds a different part of your website:
| What guests see | Where you set the links |
|---|---|
| The small icons in the footer | Website editor → Nav & Footer tab → Social Links (above). Guests see them after you publish. |
| A Social Media section on a page (large "Follow Us" buttons) | Venue Setup → Online Presence → Social Media Links. They are shown straight away, without publishing. |
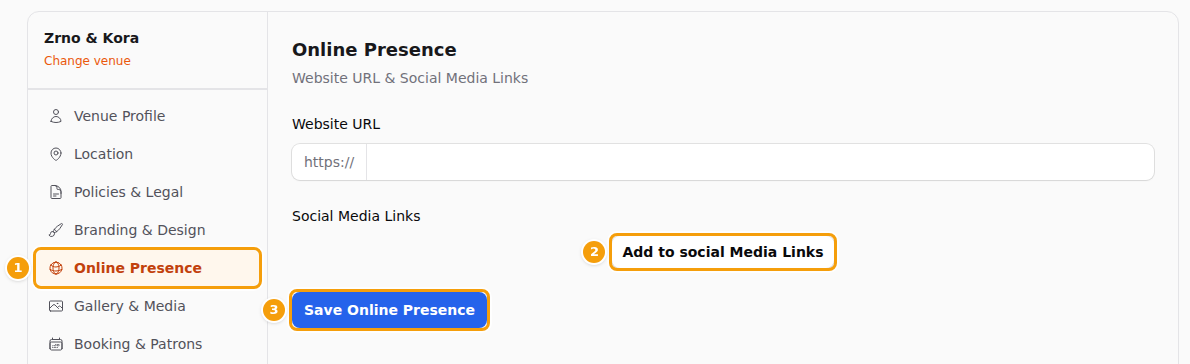
To fill in the links for a Social Media section:
- In the menu on the left, click Venue Setup, then Configure on your venue.
- Click Online Presence (1).
- Under Social Media Links, click Add a link (2), choose the Platform and paste the Profile URL.
- Click Save Online Presence (3).
Tip
Use both? Then add your links in both places, so the footer and the section show the same profiles.
Texts for Google and other search engines
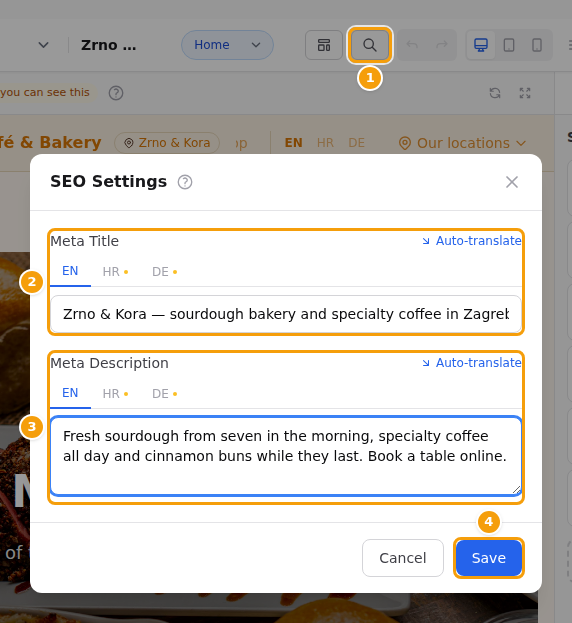
When your website shows up in Google, guests see a title and a short description. You write them here.
- Click the magnifying glass in the toolbar (SEO Settings) (1).
- Under Meta Title (2), type the title — your name and what makes you special, in about 60 characters.
- Under Meta Description (3), write one or two sentences that make people want to visit, in about 150 characters.
- Fill in every language tab, then click Save (4).
Tip
Each page can have its own search engine title and description too: open the page, click the Page tab, and fill in SEO Title and SEO Description. See Pages.
Good to know
Search engines check websites every now and then, so it can take a few days before Google shows your new texts.
Save and publish
Each part of the site settings has its own save button — changes here are not saved automatically:
| Where | Button |
|---|---|
| Site tab (site title, languages, design) | Save All Settings |
| Nav & Footer tab | Save |
| SEO Settings window | Save |
Saving puts your changes in the draft. Guests see them after you click Publish. If you forget to save, the editor reminds you when you publish — for example Save your Nav & Footer changes first. See Publish your changes.
Careful
Save before you open another tab in the side panel, switch to another location or leave the editor — otherwise your unsaved changes in the Site or Nav & Footer tab are lost.