Articles in this topic
Languages
Show your website in several languages, fill in your texts for each one, and let the editor translate them for you.
5 min read
Many of your guests may not speak your language. Your website can be shown in several languages: guests pick theirs in the menu bar, and see your texts in that language. Setting it up takes three steps: choose which languages your venue offers, switch them on for your website, and fill in your texts.
Which languages you can offer
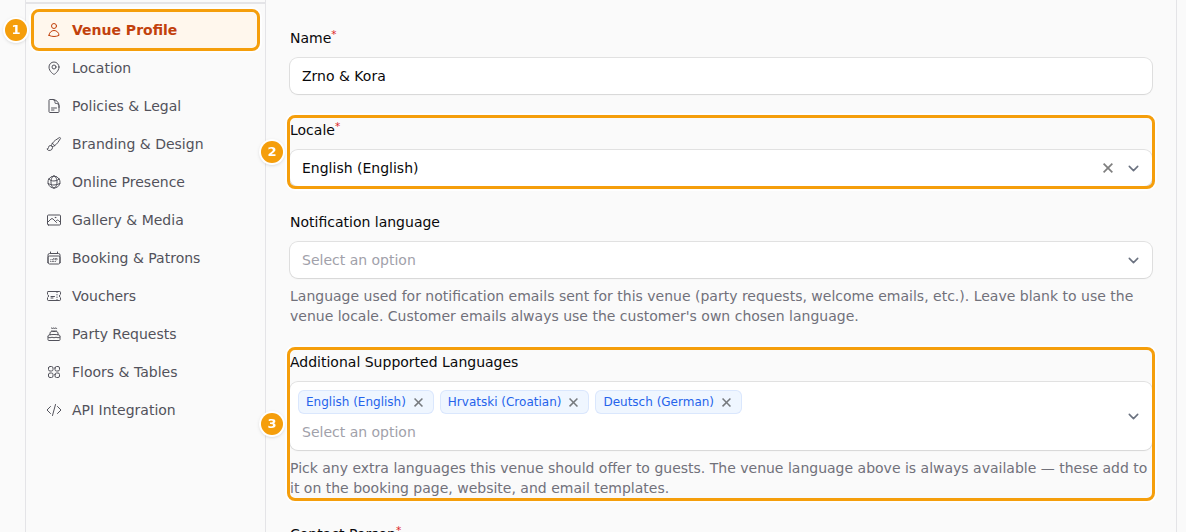
Your website can use the languages of your venue. You set them in Venue Setup:
- In the menu on the left, click Venue Setup, then Configure on your venue.
- Stay on Venue Profile (1).
- Locale (2) is the main language of your venue.
- Under Additional Supported Languages (3), add the other languages you want to offer: click the field, type the name of the language — for example German — and click it in the list.
- Scroll down and click Save Profile.
Good to know
These languages are used for your standard booking page and your emails too, not only for your website.
Switch languages on for your website
- Open the website editor and click the Site tab (the globe, the last icon) (1).
- Under Website Languages (2), tick every language your website should show.
- Scroll to the bottom and click Save All Settings.
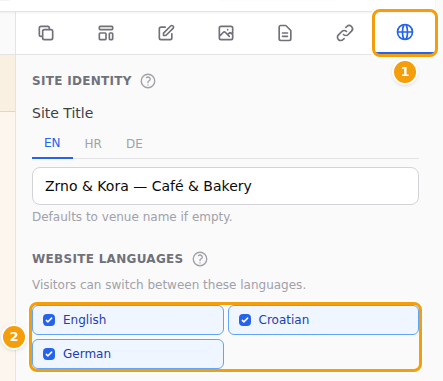
When your website has two or more languages, guests see a language switcher in the menu bar (1). With only one language, the switcher is hidden — the editor tells you so with No languages selected — language switcher will be hidden. when you untick them all.

Tip
Don't see a language in the list? Add it to your venue first — see Which languages you can offer.
Fill in your texts for each language
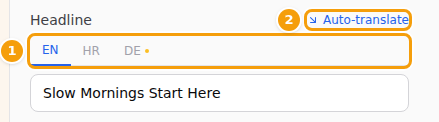
Once your website has several languages, every text field in the editor gets a tab for each language: EN, HR, DE and so on (1). A small orange dot on a tab means that language is still empty.
- Open a section in the Editor tab, or the Site or Nav & Footer tab.
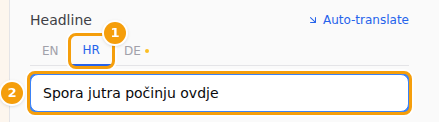
- Click a language tab (1), for example HR.
- Type the text in that language (2).
- Do the same for the other languages. When a tab has no orange dot any more, that language is complete.
- Save your texts:
- in a section, there is nothing to do: your texts are saved to the draft automatically;
- in the Site tab, click Save All Settings at the bottom;
- in the Nav & Footer tab, click Save at the bottom.
Careful
In the Site and Nav & Footer tabs, save before you open another tab, switch to another location or leave the editor — otherwise the texts you typed there are lost. See Save and publish.
Tip
Start with the main texts guests see first: the big headline at the top, your opening hours and your menu.
Let the editor translate for you
Next to many texts you see Auto-translate (see the picture above, 2). It translates the text you already wrote into all languages that are still empty.
- Type the text in one language — for example in EN.
- Click Auto-translate. While it works, it says Translating...
- Click the other language tabs and read the translations. Change anything that doesn't sound right — for example the names of your dishes, or your own way of saying things.
Good to know
Auto-translate only fills languages that are still empty; it never overwrites a text you wrote. To translate a text again, empty that language tab first.
Important
Automatic translations are good, but not perfect. If you can, ask a native speaker to read them once.
What your guests see
- Guests choose their language with the switcher in the menu bar. The page stays the same, only the language changes.
- Where a text is missing in their language, guests may see your English text instead, or an empty space. So fill in every language before you publish.
- Languages you add or remove, and your translated texts, reach your live website when you click Publish. See Publish your changes.
Good to know
The EN button at the top right of the screen changes the language of the Clava screens you work in — not the languages of your website.
Remove a language
- In the Site tab, under Website Languages, untick the language.
- Click Save All Settings, then Publish.
Your texts in that language are kept. If you tick the language again later, they come back.