Articles in this topic
Sections
Build your pages from sections — add them, change texts and photos, pick a layout, and move, hide, copy or delete them.
8 min read
Every page is made of sections, stacked from top to bottom — for example a big welcome picture, a few words about you, your menu, photos, your opening hours and a booking button. You build and change a page by adding and editing its sections.
The section list
Click the Sections tab — the second icon in the side panel. It lists the sections of the page you're on, from top to bottom. Each line shows the kind of section (for example About) and its layout (for example Text Left, Image Right).
Rest your mouse on a section to see its buttons:
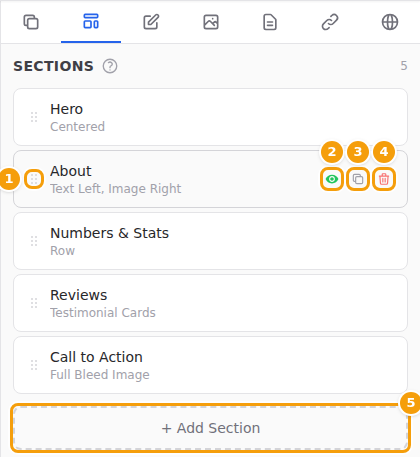
| Button | What it does | |
|---|---|---|
| 1 | Dotted handle | Drag the section up or down. See Move a section. |
| 2 | Eye | Hide or show the section (Disable / Enable). See Hide or show a section. |
| 3 | Two squares | Make a copy (Duplicate). See Duplicate a section. |
| 4 | Red bin | Delete the section. See Delete a section. |
| 5 | + Add Section | Add a new section. See Add a section. |
Tip
You can also click a section in the preview. It is then marked in blue in the list — open the Editor tab (the pencil) to change it.
Add a section
-
In the Sections tab, click + Add Section.
-
On the left, click the kind of section you want — for example Opening Hours.
-
On the right, click the design you like best.
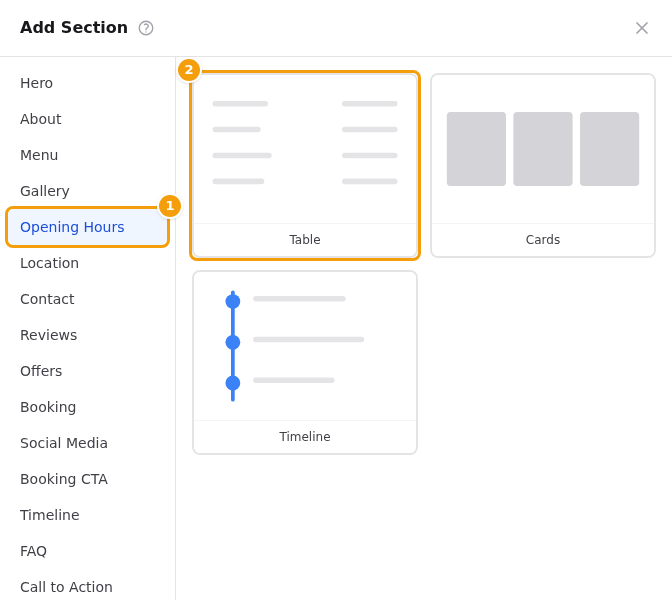
Choose the kind of section (1), then click a design (2) -
The section is added at the bottom of the page, and the Editor tab opens so you can fill it in right away.
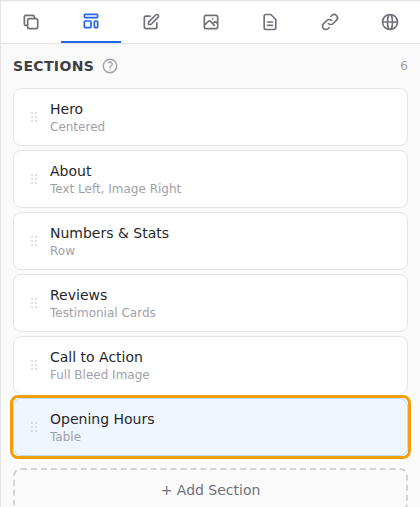
The new section at the bottom of the list -
Want it higher up? Drag it to the right place. See Move a section.
Some sections that work well for a restaurant:
| Section | What it shows |
|---|---|
| Hero | A big welcome picture with your headline — usually the first section of a page. |
| About | A few words about your restaurant, with a photo. |
| Menu | The menus you made under Venue Content → Menus, with or without prices. |
| Gallery | A set of your photos. |
| Opening Hours | Your opening hours — taken from your venue settings automatically. Every day of the week is listed; a day without opening hours shows "Closed". |
| Location | Your address, phone and email — and a map in the map designs. |
| Contact | Your phone number and email address. |
| Reviews | What your guests say about you. |
| Offers | Your current offers, from Venue Content → Offers. |
| Booking | The booking form, right on the page. |
| Booking CTA | An eye-catching invitation to book a table, with a button. |
| FAQ | Questions and answers, for example about parking or allergies. |
| Events | Your upcoming events, as a simple list. |
| Event Details | A teaser of one of your events — photo, title, date, place and price — with a button to the event's own website. See Events on your website. |
| Event Programme | A list of your events — upcoming, past or both — as an agenda, cards, a calendar or a timeline. Each event opens on its own website. See Events on your website. |
| Social Media | Buttons to your Instagram, Facebook and other pages (see below). |
| Rich Text | A longer text with headings, bold words and lists — for example your story or your house rules. |
There are more kinds in the same list. These ones are on location websites and on party websites too:
| Section | What it shows |
|---|---|
| Timeline | A row of steps or times — your story over the years, or the programme of a day. |
| Call to Action | One strong message with one button, as a banner, a card, a picture or a split. |
| Divider | Space or a line between two sections, in four styles. |
| Team | The people of your venue, each with a photo, a role and a few words. |
| Numbers & Stats | Big numbers with a label, for example "450+ cocktails". They can count up as the visitor scrolls. |
| Video | A video you uploaded or a video link, for example from YouTube, with a caption. |
And these are for location websites only:
| Section | What it shows |
|---|---|
| Pricing & Packages | Packages or price lists in columns, cards or a comparison table; one package can be highlighted. A location in Croatia also types the anchor price of each package. |
| Logos & Press | A row of logos: partners, suppliers or the press that wrote about you. Each logo can link to a page. |
| Newsletter | A short sign-up form with a title, a text and a button. You download the subscribers as a CSV file in the editor. |
| Our Locations | Cards of your other locations, with links to their websites or booking pages. It needs more than one location, see Several locations. |
Good to know
A section with a small lock is not part of your plan. Clicking it shows Upgrade to unlock more sections.
Good to know
Where do the Social Media links come from? The Social Media section shows the links of your venue: you enter them outside the website editor: in the menu on the left, click Venue Setup, then Configure on your venue, then Online Presence (Social Media Links). The small social media icons in the footer of your website are set somewhere else — in the Nav & Footer tab. See Social media and contact details.
Sections for party websites only
A party or event website has a list of its own. It offers the shared kinds above — Hero, About, Menu, Gallery, Location, Contact, Social Media, Timeline, FAQ, Call to Action, Divider, Team, Numbers & Stats, Video and Rich Text — but not the restaurant kinds such as Opening Hours, Reviews, Offers, Booking or Events. In their place it has the kinds below.
| Section | What it shows |
|---|---|
| Places & directions | The places of the day with their times, addresses and maps, see Places and directions. |
| RSVP | Where guests confirm that they are coming. You can ask for a phone number and allow a note. On a closed party, a visitor sees an invitation-only message instead of the form. |
| Tickets | The active ticket types of the party, with the number left if you like. |
| Gift Registry | Your gift lists from Present Lists; you can hide gifts that are fully promised. |
| Countdown | Counts down to the date and time of the party, with a message for when it is over. |
| Shop | The products of your Shop. Guests reserve them and pay at the venue. |
| Guest Area | The page of a signed-in guest: checklist, answer, details, plus-ones, menu choice, questions, gift claims and shop orders. You choose the panels. A visitor sees a sign-in form instead. |
| Photo Wall | The photos your guests share, see Guest photo sharing. |
| Guestbook | The messages guests wrote to you, see The guestbook. |
| Your table | Each guest sees which table they sit at, see Your table. |
| Share & Invite | An invite card or buttons: guests send the link of the page with the phone's share menu, WhatsApp or e-mail. |
| Guest sign-in | The sign-in form of the guests, see How guests sign in. |
Five more kinds exist only on the website of an event series or of one of its meetups: Series meetups, Series membership, Who is coming, Member directory and Speakers. You will not find them on a client party or on your location's website. What each one shows, and where it can stand, is in The sections for a series.
The Photo Wall, Guestbook and Your table are always for signed-in guests only, see Who sees a page or a section.
Edit a section
- Click the section in the Sections list. The Editor tab opens.
- Change the texts. Each text has language tabs (EN, HR …): type the text for every language your website shows. A small orange dot on a tab means that language is still empty. Where you see Auto-translate, click it to fill in the empty languages for you. See Languages.
- To add or change a photo, click Select Image (or Change on the current photo) and pick one from My Images or the Library. See Images.
- Watch the preview: it shows your change after a moment.
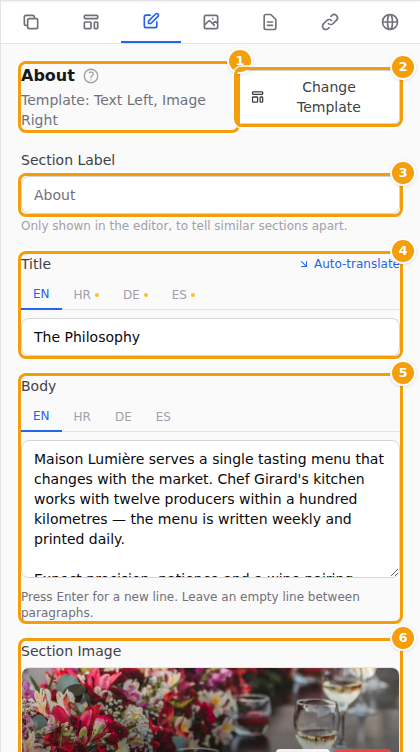
What you can change depends on the kind of section: a Hero has a headline and a background picture, a Menu lets you choose which menus to show, an Opening Hours section only has a title (the hours come from your booking calendar), and so on. Depending on its layout, a Hero also lets you set Overlay Opacity (how dark the picture is behind the text) and Logo Size.
Tip
The Section Label is a name only you see, in the section list. Use it to tell similar sections apart — for example Summer terrace and Winter garden.
Longer texts
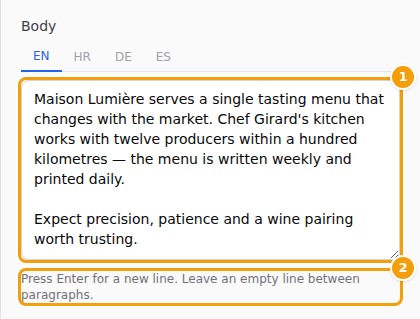
Some texts are longer, for example the Body of an About section. You type them like an email:
- press Enter to start a new line;
- leave an empty line between two paragraphs.
The small grey hint below the text box reminds you. What you see in the box is how the lines appear on your website.
Want bold words, headings or a list? Use a Rich Text section. Its text box understands a few simple signs:
| You type | Your website shows |
|---|---|
**Sunday brunch** (two stars on each side) |
Sunday brunch in bold |
## Our wines at the start of a line |
a heading |
- Vegetarian at the start of a line |
a bullet point in a list |
| an empty line | a new paragraph |
Good to know
In the other sections, stars and other signs are shown exactly as you type them. Only the Rich Text section turns them into bold words, headings and lists.
Saved to draft
You don't need to save: about a second after you stop typing, your change is saved to the draft. At the bottom of the editor you can follow it:
- Unsaved changes (orange) — you are still typing;
- Saving... — your change is being saved;
- Saved to draft (green) — done.
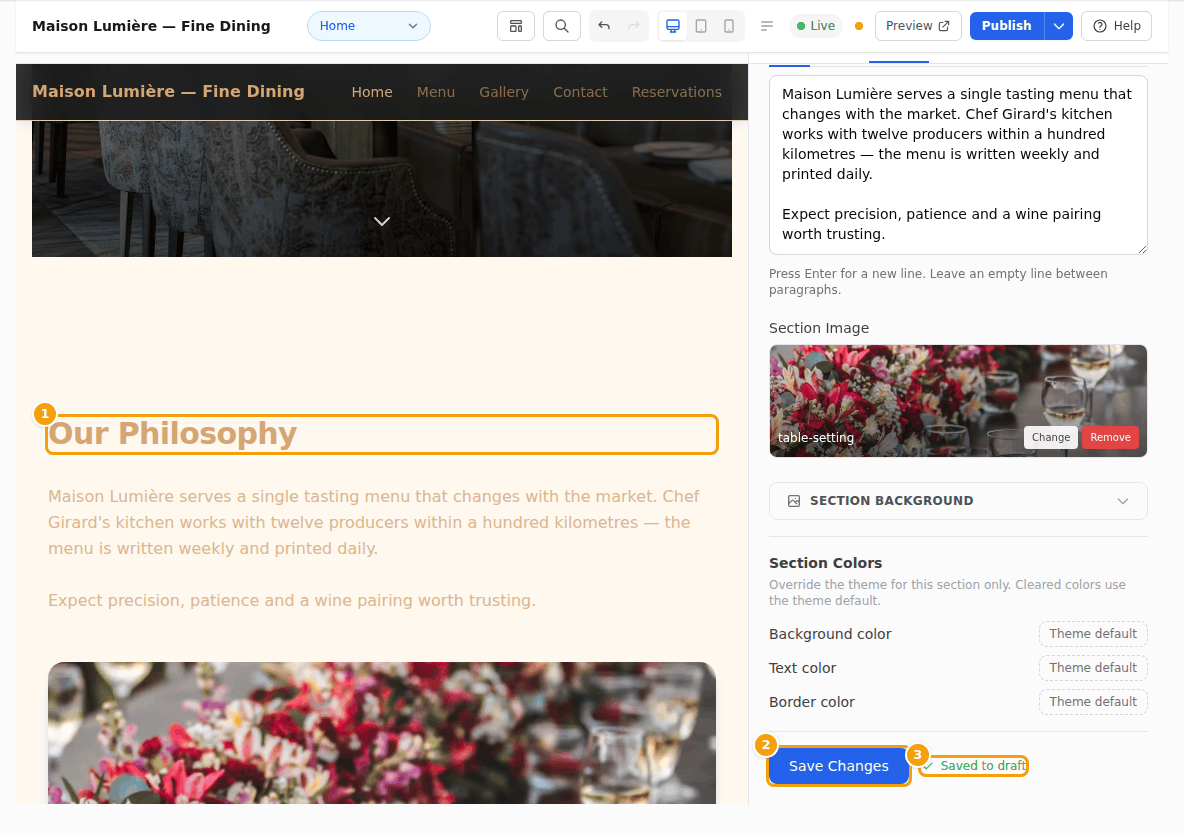
You can also click Save Changes at any time, for example before you close your browser.
Good to know
Saved to draft means saved, but not published yet. Guests see your changes after you click Publish. See Publish your changes.
If a change can't be saved — for example because the internet connection dropped — a red message appears next to Save Changes. Check your connection and click Save Changes again. See Troubleshooting.
Choose a layout
Each kind of section comes in several layouts — for example the text on the left and the photo on the right, or the other way round.
- Open the section in the Editor tab.
- Click Change Template at the top.
- In the Choose Template window, click the layout you want. The current one has a blue check mark.
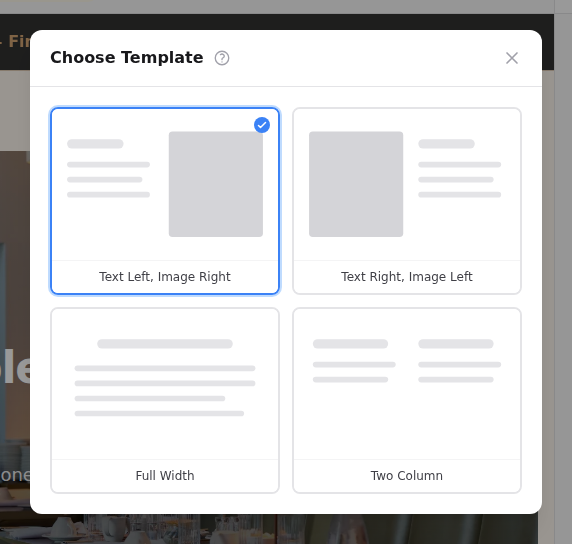
Your texts and photos stay; only the way they are arranged changes.
Important
"Template" means two different things in the editor:
- Change Template in the section editor changes the layout of this one section — nothing else.
- The Templates button in the toolbar replaces your whole draft with a ready-made website: pages, sections and colours. See Start from a template.
Background and colours
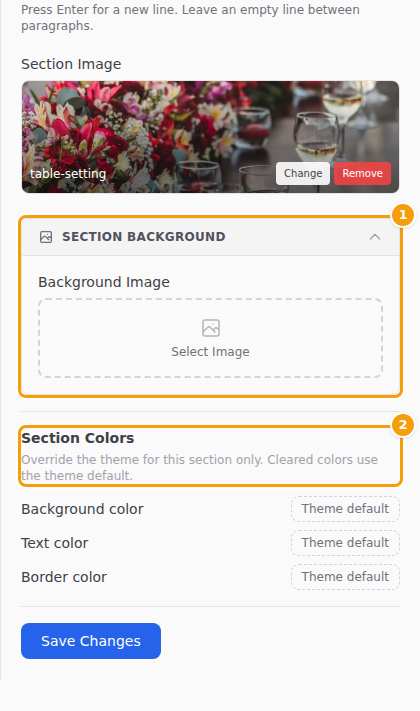
Below the texts of every section you find two more settings:
- Section Background — click it to open it, then choose a Background Image. You can soften the picture with Blur, Brightness, Saturation and an Overlay colour, and choose whether it moves with the page (Scroll) or stays in place (Fixed (Parallax)). Remove background takes the picture away again.
- Section Colors — a different Background color, Text color or Border color for this one section. Click Theme default next to a colour to pick your own; click the small cross (Use theme default) to go back to the colours of your website.
Tip
To change the colours of your whole website at once, use the Site tab instead. See Colours and fonts.
Move a section
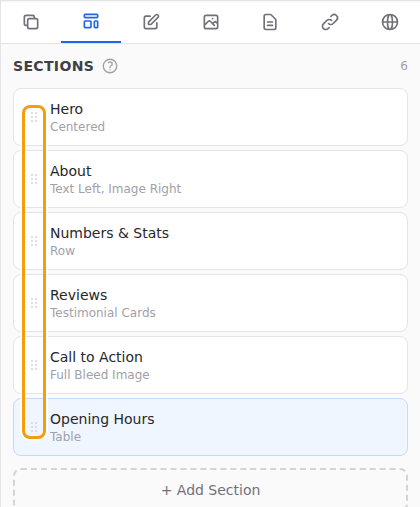
- In the Sections tab, point at the dotted handle on the left of a section.
- Hold the mouse button down, drag the section up or down, and let go where you want it.
- The preview shows the new order.
Hide or show a section
Hide a section when you want to keep it for later — for example your summer terrace, or a seasonal offer.
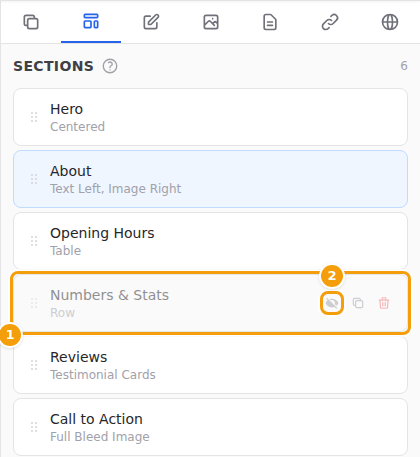
- In the Sections tab, rest your mouse on the section.
- Click the eye (Disable). The section turns pale in the list and disappears from the preview.
- To show it again, click the crossed-out eye (Enable).
As always, guests see the change after you publish.
Duplicate a section
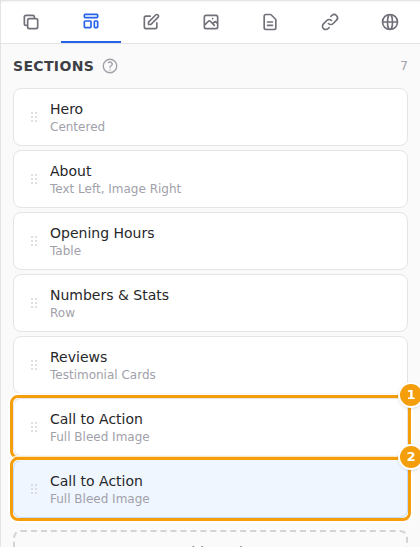
- Rest your mouse on the section and click the two squares (Duplicate).
- The copy appears right below the original and opens in the Editor tab.
- Change the copy, and move it where you want it.
Tip
Give the copy a Section Label, so you can tell the two apart in the list.
Delete a section
-
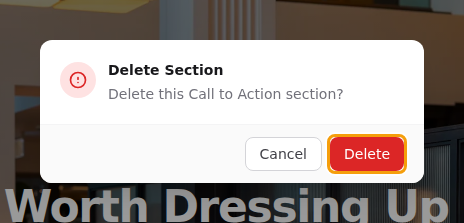
Rest your mouse on the section and click the red bin (Delete).
-
The editor asks Delete Section. Click Delete, or Cancel to keep the section.
Confirm with Delete
Deleted the wrong one? Click the undo arrow in the toolbar straight away — see below. Until you publish, the section is still on your live website.
Undo and redo
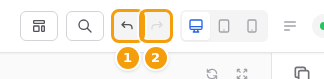
The two arrows in the toolbar take back your latest changes to sections, one step at a time:
- Undo (arrow to the left) — or press Ctrl+Z (on a Mac: Cmd+Z);
- Redo (arrow to the right) — puts back what you undid. Or press Ctrl+Shift+Z (on a Mac: Cmd+Shift+Z).
Good to know:
- Undo works for changes to sections: adding, editing, moving, hiding, copying and deleting them.
- It remembers up to 30 steps — only the changes you made since you opened the editor.
- It does not undo changes to pages, or in the Nav & Footer and Site tabs.
- While you are typing in a text field, Ctrl+Z undoes your typing in that field.
Good to know
These arrows only change your draft. To take back a publish, use Undo in the green message that appears after publishing, or the version history. See Undo a publish.