Articles in this topic
What Venue Setup is for
Describe each of your locations once — name, address, policies, colours, bookings, tables — and Clava uses it on your website, booking page, emails and team screens.
5 min read
Venue Setup is where you describe each of your locations — your restaurant, café or bar — once. Clava then uses what you enter everywhere: on your website and booking page, in the emails your guests receive, and on your team's booking screens.
Where your information shows up
Everything you enter in Venue Setup ends up in front of your guests or your team:
| Where | What comes from Venue Setup |
|---|---|
| Your website | Your contact details, your address and the map, your logo and colours, and the languages your website can offer. |
| Your booking page | Your logo and colours, the language buttons, the booking calendar behind it, the optional tick boxes on the booking form, and — if you switch them on and your plan includes them — the voucher code field and a tab for party and event requests. |
| Emails to your guests | The standard booking confirmation email shows your venue's name, address, phone, email and website address, and your texts for cancellation, payment and late arrival. |
| Your team's screens | The floors and tables you describe appear on the booking boards in Booking Management. |
Good to know
Venue Setup has no Publish button. What you save is live right away. Only your website's colours need a little more care: when you save them in Branding & Design, Clava also copies them to your website, and may ask you to publish. See Branding and colours.
Open Venue Setup
Venue Setup is part of Configuration, the area for administrators. Editors and readers can't open it — see Team roles.
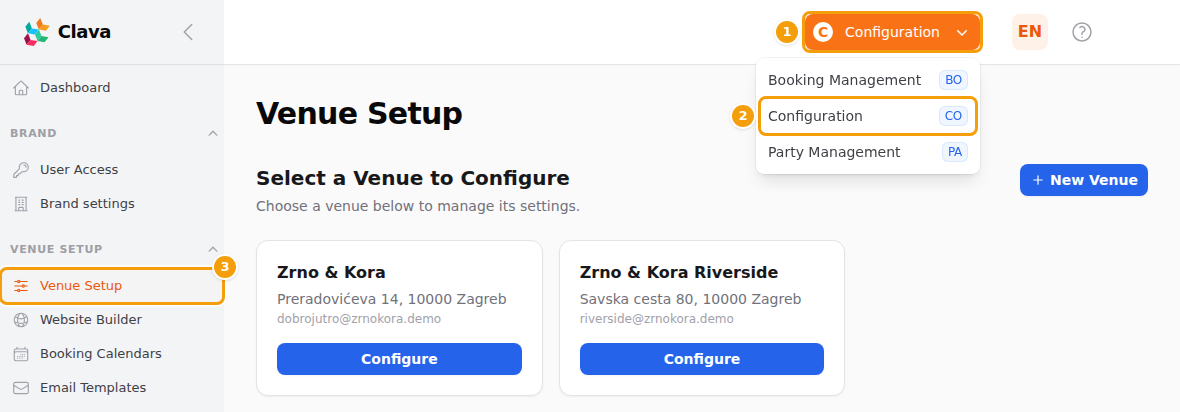
- Sign in. Administrators land in Configuration automatically. If you are in another area, such as Booking Management, click the orange button at the top right (1) and choose Configuration (2).
- In the menu on the left, under Venue Setup, click Venue Setup (3).
Tip
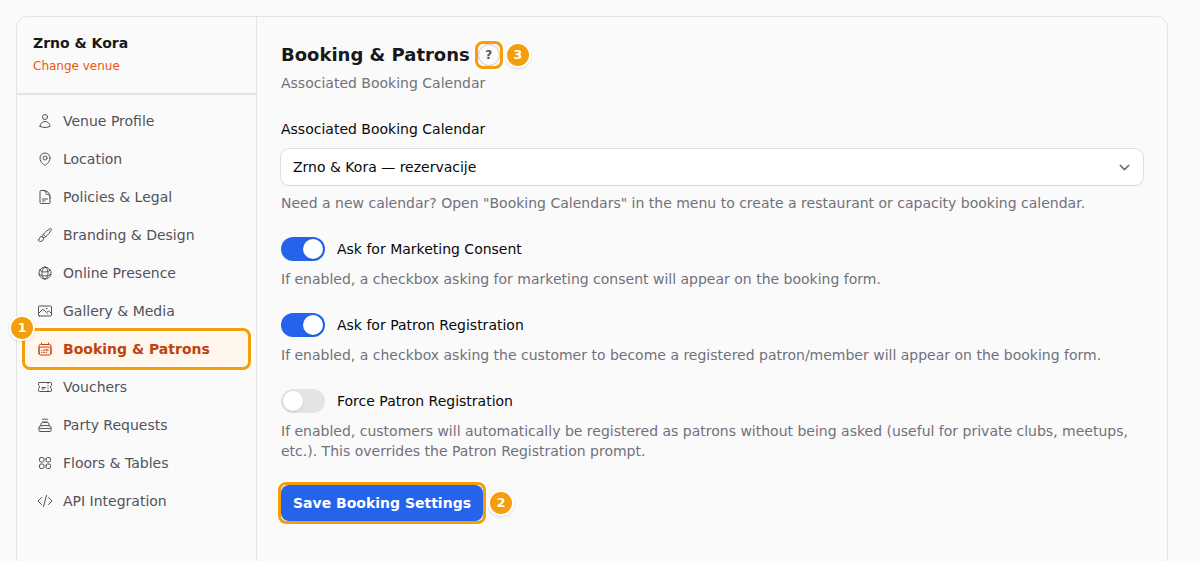
The round ? at the top of the screen opens the help for the page you are on. Every tab in Venue Setup also has its own small ? next to its name.
Choose a venue
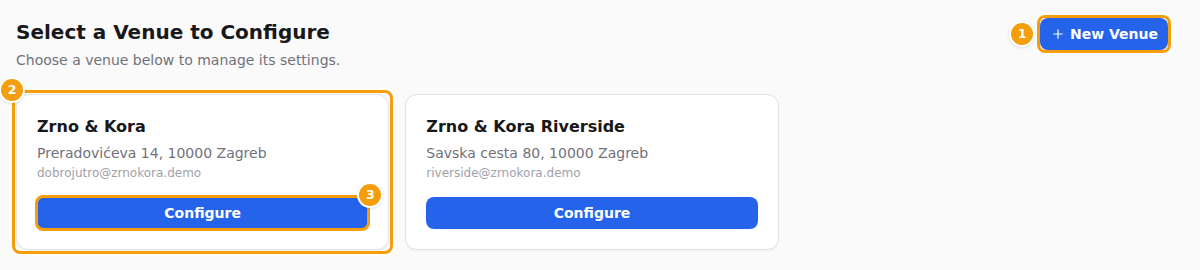
Venue Setup always starts with the list of your venues — even if you only have one. Each card shows the venue's name, and its address and contact email once you have filled them in. The list shows only the venues of the business you are working in, sorted from A to Z.
- Find the card (2) of the venue you want to set up.
- Click Configure (3).
The venue opens on its Venue Profile tab. The New Venue button (1) adds another venue — see Add a new venue.
Good to know
Work for more than one business? Choose the business at the top of the screen first. See Working for more than one business.
No venues yet? The list then says No venues found. Create a venue first. Add your first venue as described below.
Add a new venue
Add a venue for every location you run. Start from nothing, or from a copy of one of your other venues — see Copy another venue. Fill in the basics now — you can change all of them later in the Venue profile.
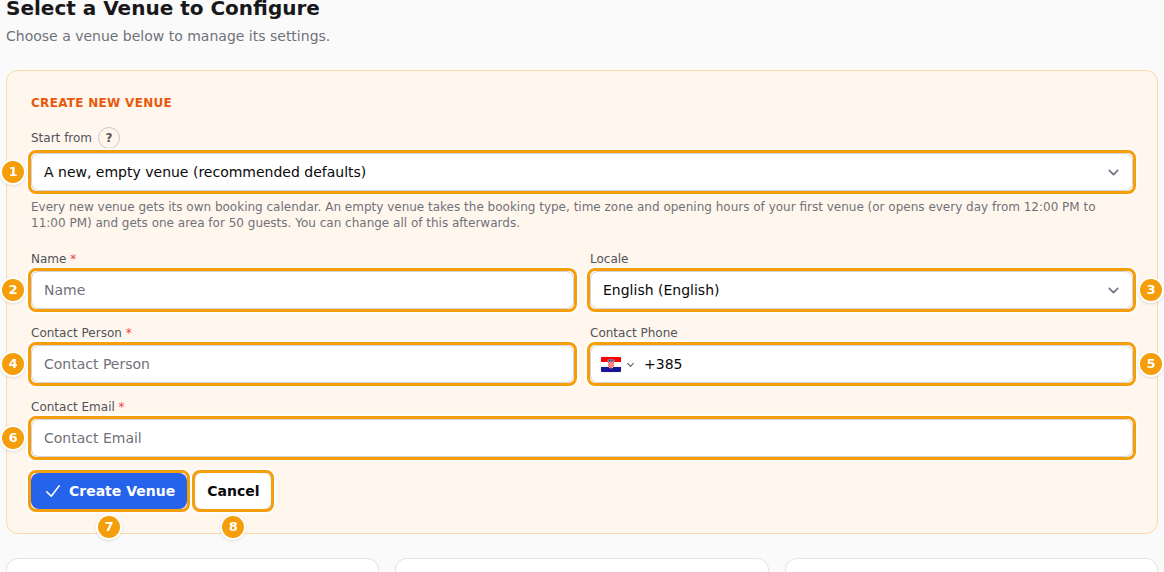
- Click New Venue at the top right of the list. A form opens above the cards.
- Next to Start from (1), leave A new, empty venue (recommended defaults), or choose one of your venues to copy it.
- Type the venue's Name (2).
- Choose the Locale (3). This is the main language of the venue: guests see your pages in it unless they pick another language. It starts in the language of your brand's first location (English (English) if you have none yet), so change it if your guests speak another language.
- Fill in Contact Person (4), Contact Phone (5) and Contact Email (6). Guests don't see the contact person's name. They do see the phone number and the email address, for example in their booking confirmation email and in the contact details of your website. For the phone number, Croatia is preselected and its dial code +385 stands next to the flag: type the rest of the number, for example 1 5550 909. For another country, click the flag and choose it first. Clava shows the number the same way every time, like +385 1 5550 909.
- Click Create Venue (7). Changed your mind? Click Cancel (8) — nothing is created.
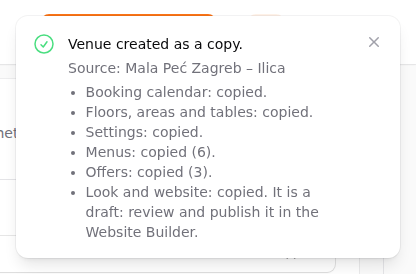
A green message, Venue created successfully., appears at the top right and the new venue opens on its Venue Profile tab. The message also says what Clava made along with the venue, and it stays on the screen until you close it.
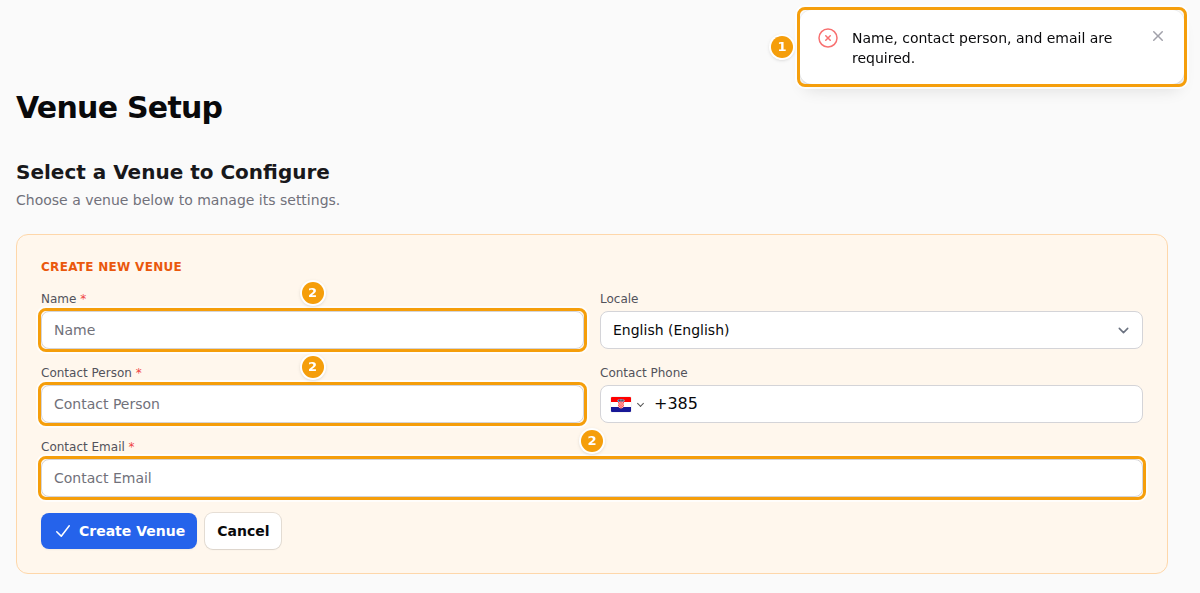
A field with a red star is required: Name, Contact Person and Contact Email. If one of them is empty, a red message says Name, contact person, and email are required. (1) and nothing is created. The phone number is optional, here and in the Venue Profile tab. If you fill it in, it has to be a real phone number: otherwise a red note under the field says so and nothing is created.
Tip
This form doesn't check the email address. Type it carefully — the Venue Profile tab does check it, and will refuse to save a wrong one.
What a new venue starts with
Every new venue gets its own booking calendar the moment it is created, so guests can book from the start. You don't have to make one yourself:
- A new, empty venue takes the booking type, the time zone and the opening hours of your first venue. If you have none, it is open every day from 12:00 PM to 11:00 PM.
- It gets one setup, Default Setup, with one area, Main Area, for 50 guests. If your first venue takes bookings for particular tables (the Restaurant/Venue booking calendar type), the area has no tables yet.
- Its booking page is made and live, with the venue's name, opening hours, a booking form and contact details.
The rest starts empty: no address, no policy texts, no logo or colours of its own, no menus. Its own website is made the first time it is needed — for example when you open the venue in the website editor. See Add a location. Work through the tabs below.
Important
The calendar and the area are only sensible starting values. Before you tell guests about the venue, open Floors & Tables (see Floors and tables) and the booking calendar (see What a booking calendar does) and check the opening hours, the number of guests and, for table bookings, the tables.
Copy another venue
Opening a second restaurant of the same kind? Don't set it up again: copy a venue you already have. The copy is a new venue with its own booking calendar, and it is independent of the original from then on.
- Click New Venue. Next to Start from (1), choose the venue you want to copy. The list shows only the venues of the business you are working in, in the order you created them. The language of the new venue switches to the language of the venue you chose; change it if the new venue needs another one.
- A box with a tick box for each part appears. Everything the venue has is ticked. Untick what the new venue should start without. A part the venue doesn't have is greyed out and says Nothing to copy.
- Fill in the Name, the language and the contact details of the new venue. These are never taken from the original: what you type here always wins.
- Click Create a copy of and the name of the venue. Copying can take a few seconds, so the button waits.
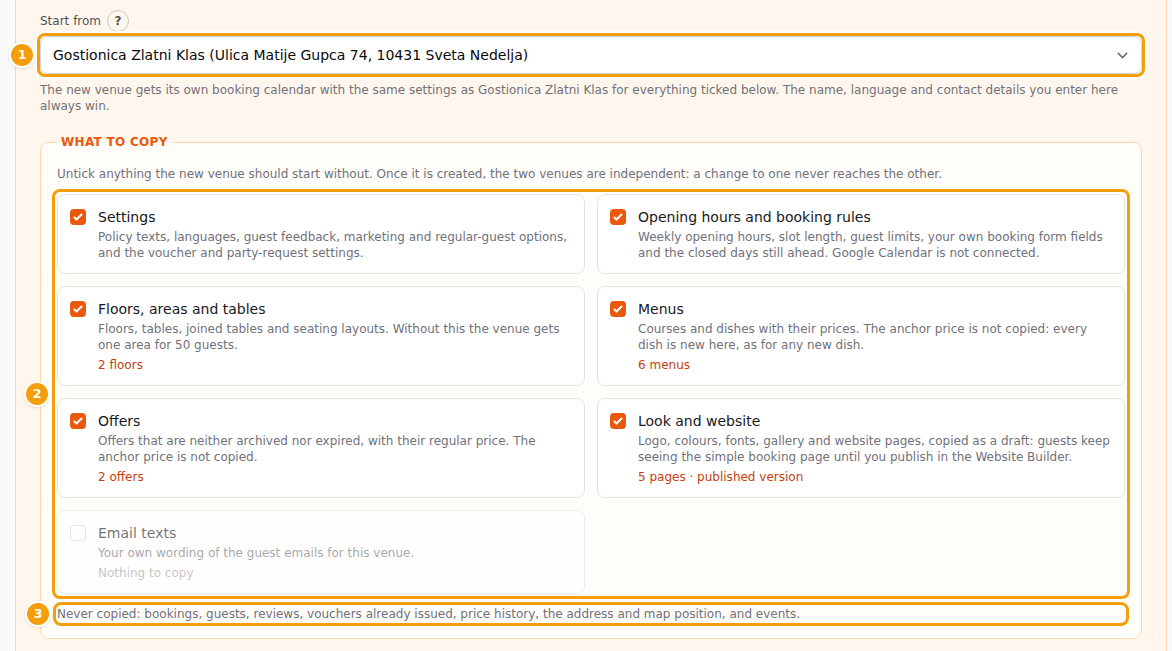
Here is what each tick box brings along:
| Tick box | What the new venue gets |
|---|---|
| Settings | Policy texts, languages, guest feedback, the marketing and regular-guest options, and the settings for vouchers and party requests. |
| Opening hours and booking rules | A booking calendar with the same settings: opening hours, slot length, guest limits, your own booking form fields and the closed days that are still ahead. Google Calendar is not connected, and booking summary emails go to the new venue's own contact email. |
| Floors, areas and tables | The setups, floors, tables, joined tables and seating layouts. Without this, the venue gets one area for 50 guests. |
| Menus | The menus with their courses and dishes, and the prices. See anchor prices below. |
| Offers | The offers that are neither archived nor expired. |
| Look and website | The logo, colours, fonts, gallery and the pages of the website, as a draft. See the website below. |
| Email texts | The guest emails you reworded for this venue. Shown only when the original has some. |
Next to floors and tables, menus, offers, email texts and the website, the box says how many the original has. For the website it also says which version is copied: the published one, or the draft if it was never published. If your plan allows only a few more menus or offers, it says so, for example room for 4 more on your plan, and Clava copies as many as fit (oldest first). The message after creating lists what was left out.
The box always ends with what is never copied: bookings, guests, reviews, vouchers already issued, price history, the address and map position, and events. Nobody's bookings or guest details are ever copied, whatever you tick.
Prices and anchor prices
Prices are copied as they are, but the new venue's dishes and offers are new products: their anchor price (the regular price shown next to a price in Croatia) is not copied, and special prices and the lowest price of the last 30 days start fresh. In Croatia Clava sets the anchor price itself when a dish or offer goes on sale at the new venue, as for any new product: it is the price you copied, so no earlier price is shown. See Anchor prices.
The website is copied as a draft
The website pages, colours and logo come over as a draft in the website editor. Nothing is published: guests keep seeing the simple booking page the new venue starts with, until you open the website editor, check the copy — texts, phone numbers and addresses are copied as written, so they still say the original's — and click Publish. See Publish your changes. If you untick Menus or Offers but copy the website, the menu and offer sections show the original venue's menus and offers until you choose others.
The message after creating
A message at the top right lists what was copied, one line per part, for example Menus: 4 of 6 copied. It is green when everything went as you asked and amber when something could not be copied, for example because your plan has no room for more menus. A part that fails never stops the venue from being made: the venue and its booking calendar exist either way, and you can fix the rest by hand. The message stays until you close it.
The working screen and its tabs
After you click Configure, the screen has two parts: the list on the left and the open tab on the right.
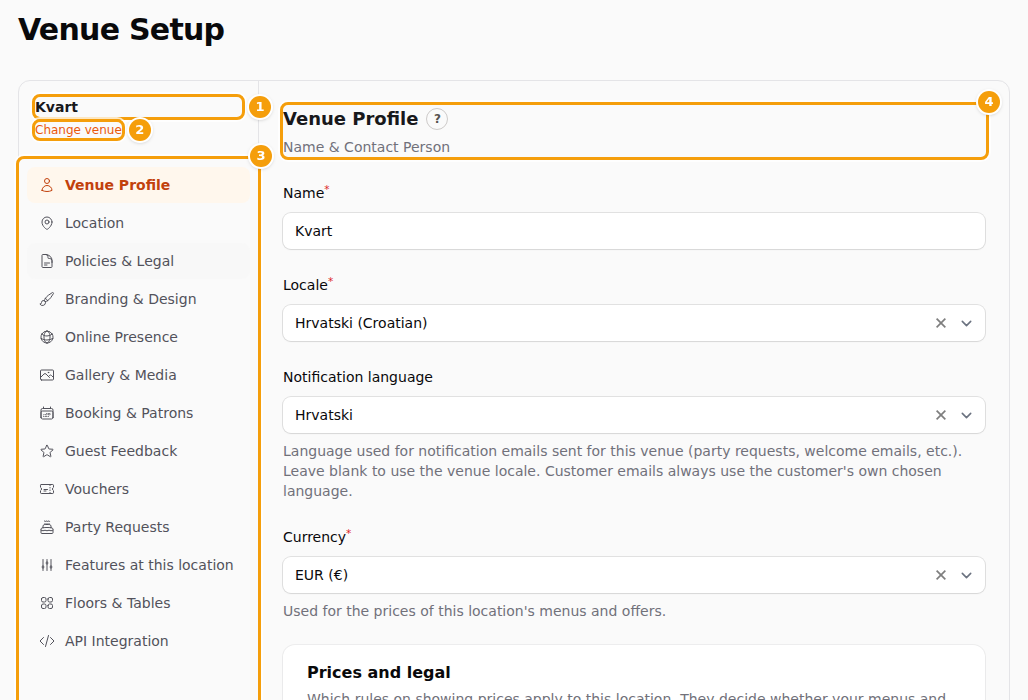
- (1) The name of the venue you are working on.
- (2) Change venue takes you back to the list of venues. Clava doesn't ask whether you want to keep unsaved changes — see Save your work.
- (3) The tabs. Click one to open it. The open tab is highlighted. The screen always opens on Venue Profile.
- (4) The name of the open tab, with its small round ? for help, and below it the form for that tab.
Here is what each tab is for:
| Tab | What you do there | Learn more |
|---|---|---|
| Venue Profile | Your venue's name, its main language and extra languages, and the contact person, phone and email. | Venue profile |
| Location | The address of your venue and its position on the map. | Address and map |
| Policies & Legal | Your texts for late arrival, cancellation and payment — one text per language. | Policies and legal texts |
| Branding & Design | Your logo, colours and font. | Branding and colours |
| Online Presence | The address of your own website and your social media profiles. | Website and social media links |
| Gallery & Media | Your location's photo library: upload, crop and delete photos — the same photos as the website editor's Media tab. | Photos for your location |
| Booking & Patrons | Choose the booking calendar this venue uses, and the optional tick boxes on the booking form. | Bookings and guests |
| Guest Feedback | Ask guests for a review the day after their visit, write your own message to them and point them to Google or TripAdvisor. | Guest feedback and reviews |
| Vouchers | Accept voucher codes and hand out vouchers to returning guests. Depends on your plan: without vouchers in your plan, the tab shows a note instead of the settings. | Vouchers at a location |
| Party Requests | Let guests send you an enquiry for a party or celebration, and choose who is told. Depends on your plan. | Event and celebration requests |
| Features at this location | Switch the internal events and the event series on or off for this location. | Switch events and series off |
| Floors & Tables | Describe your rooms, areas and tables, and how many guests fit. | Floors and tables |
| API Integration | The details a web developer needs to connect your own website to Clava. | Connect your own website (API) |
Tip
Setting up a new venue? Start with Venue Profile (check the language), then Location, Policies & Legal and Branding & Design. Then open Booking & Patrons to choose the booking calendar, and Floors & Tables to describe your tables. The other tabs can wait until you need them.
Switch events and series off
Not every brand uses internal events (the Events page, tickets and reservations) or event series (the Series page, members and meetups). Both are on by default.
For the whole brand. Open Brand settings, untick Internal events or Event series in the Features card and save. The card says: Switched off here, it is off at every location.
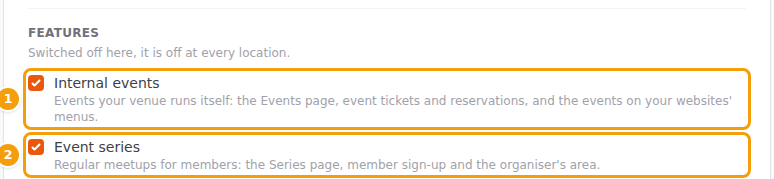
For one location. Open that location's Features at this location tab, untick the feature and click Save Features. When the brand has a feature off, the location's switch is greyed out and says Switched off for the brand.
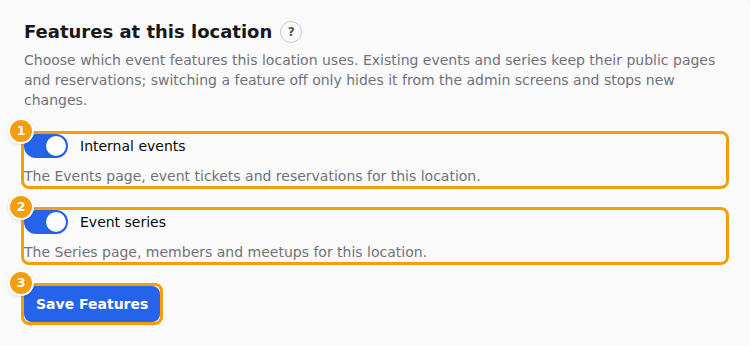
What a switch off does. It only hides the feature and stops new changes; nothing is deleted.
- The page (Events or Series), its menu entry and its links in other screens disappear. You can still cancel or archive what exists.
- The website editor stops offering what belongs to it. With events off, the event sections (Event Details, Event Programme, the events page) are locked for that location (sections already on a page stay), the link picker for an event is empty and the template wizard skips the Events page. With series off, the series picker is empty.
- The dashboard of the Party Manager stops counting events and counts only parties your guests hold.
- Existing events and series keep their public pages, reservations and emails.
Switch it back on at any time.
Save your work
Every tab saves on its own, and nothing in Venue Setup is saved automatically.
- Change what you need on the tab.
- Click the tab's own save button (2). It is named after the tab, for example Save Profile, Save Location or Save Booking Settings, and sits below the form.
- Look for the green message Changes saved successfully. at the top right.
Good to know:
- One save covers one tab. Saving Venue Profile doesn't touch Location, and the other way round.
- A mistake stops the save. If a field is wrong or missing, a red note appears under it and nothing on that tab is saved — not even the fields that are fine. Fix it and click save again.
- Switching tabs doesn't save. On the tabs with a form, what you typed stays on the screen while you open another tab and come back — but it is not saved until you click that tab's save button.
- Change venue, reloading the page, closing the tab or signing out throw away everything unsaved. Clava doesn't warn you first, so save before you leave.
- Floors & Tables has no single save button. New Setup adds a setup the moment you click it, and Save Setup, Save Floor and each table's Save save only their own part. Deleting something asks you to confirm first. On API Integration every button acts at once, and Gallery & Media has nothing to save.
Careful
Policies & Legal is the one tab that does not keep your text when you switch tabs. It has its own Save policies button at the top right of the editor. The button is greyed out until you change something, and a small green Saved appears next to it instead of the green message. Click it before you open another tab, or what you typed is gone.