Articles in this topic
Event and celebration requests
Let guests send you an enquiry for a birthday, a company dinner or another celebration, choose who in your team is told, and see what happens after a request arrives.
7 min read
Some guests want more than a table for four: a birthday, a company dinner, a wedding party. With Party Requests switched on, your booking page gets a second tab, Plan a Party, where the guest can describe the occasion and send you an enquiry. Nothing is reserved yet — the enquiry waits in a list for your team to answer.
Switch on party requests
- In Venue Setup, click Configure on your location, then click Party Requests.
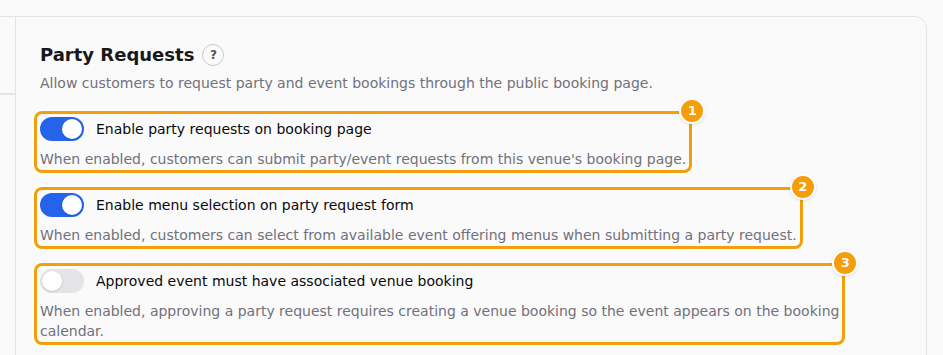
- Switch on Enable party requests on booking page (1). That is the main switch.
- Optional: switch on Enable menu selection on party request form (2) so guests can pick a menu — see Let guests pick a menu.
- Leave Approved event must have associated venue booking (3) as it is — see the note below.
- Set who is told about new requests (next section), then click Save Party Request Settings. A green message, Changes saved successfully., confirms it.
Every location has its own settings. If you run two locations, open each one and switch it on where you want it.
Important
The switch only does something when your plan includes party management (Pro and Ultimate, and the free trial). On other plans you can still switch it on and save it, and you get the green message — but guests see no Plan a Party tab and nothing happens. Clava does not warn you here. If the tab does not show up for your guests, check your plan first.
What your guests see
Once the switch is on, guests see two tabs at the top of your booking form: Book a Table and Plan a Party (1). The tabs appear on your standard booking page, in the booking widget and in every booking section and the booking page of your website. The tab Plan a Party opens the request form (2):
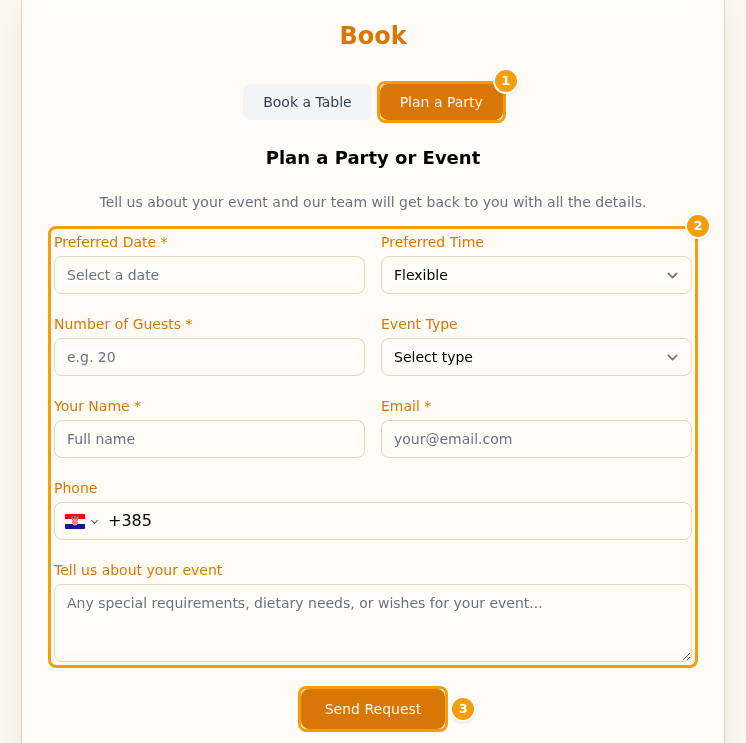
The guest fills in:
| Field | Required? |
|---|---|
| Preferred date | Yes — today or later |
| Preferred time | No — a short list of times from 12:00 to 21:00; the first choice is Flexible |
| Number of guests | Yes |
| Event type | No — Birthday, Corporate Event, Anniversary, Wedding or Other |
| Select a menu | Only if you switched on menu selection and a menu is available |
| Preferred Space | No — only if you marked rooms as event spaces (see Floors and tables); the first choice is No preference |
| Your name, Email | Yes |
| Phone | No — if given, it must be a real phone number. The flag shows Croatia (+385); the guest types the rest, or chooses another country at the flag first |
| Tell us about your event | No — wishes, dietary needs and so on |
When the guest clicks Send request (3), the form is replaced by Request sent! and a short thank-you. The guest also gets an email at once: We've received your request, with a summary of what was entered.
Good to know
If your location works by enquiry only — a wedding estate, a room you hire out — switch Online Booking off on the booking calendar (see Booking rules). Guests then see just the request form, without the Book a Table tab.
Good to know
The emails to the guest about a request — received, approved, declined — are written in the main language of your location (see Venue profile), not in the language the guest was using on your page. If your guests come from several countries, write the texts so they work for all of them.
A request is not a booking. The date is not checked against your calendar: guests can ask for a day that is fully booked or a day you are closed. You decide when you answer.
Let guests pick a menu
With Enable menu selection on party request form switched on, the form gets a drop-down Select a menu. The first choice is No preference. The chosen menu is saved with the request and shown to your team as Selected Menu.
The list only shows menus that
- belong to this location,
- are active and currently valid, and
- have the scope Event Offering.
You set the scope under Venue Content → Menus, in the field Scope (the choices are Website and Event Offering). If no menu qualifies, the drop-down does not appear at all — even though the switch is on. Prices in the list are shown in your location's currency (Venue Setup → Venue Profile → Currency).
Decide who is told
Three settings decide how your team learns about a new request.
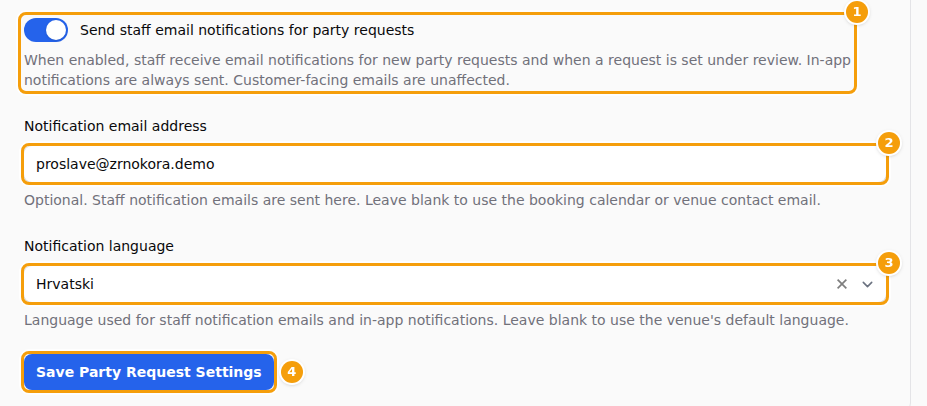
- Send staff email notifications for party requests (1) is on from the start. Leave it on so that somebody receives an email for every new request, and for every request a colleague sets to Under Review.
- In Notification email address (2) type the address that should receive these emails — for example events@yourrestaurant.com. It must be a single address; a list separated by commas is refused with a red message under the box.
- Under Notification language (3) choose the language of these staff emails: English, Deutsch or Hrvatski.
- Click Save Party Request Settings (4).
If you leave the address empty, Clava uses the first address it finds in this order: the BCC Email of your booking calendar, then its Summary Email (see Emails and messages), then the Contact Email of the location (see Venue profile). If there is none of these, nobody is emailed and Clava says nothing.
If you leave the language empty, Clava uses the Notification language of the location's profile, and if that is empty too, the main language of the location.
Careful
The help text under the email switch says that in-app notifications are always sent. In reality the bell in the top bar of Party Management only shows a notice when a colleague sets a request to Under Review — a brand-new request does not make it ring, and the other areas have no bell at all. So keep the email switch on, give it a real address, and look at your list of requests every day.
The staff emails are only about your team. The emails to the guest are not affected by the switch.
What happens after a request
Your team answers requests in the area Party Management. Click the orange button at the top right, choose Party Management, and in the menu on the left click Party Requests. The area only appears for plans with party management.
- The list shows every request with the name, the event type, the preferred date, the number of guests and its status. Click a request to open it.
- The request shows what the guest wrote and, under Day Availability, the bookings, guests and capacity of each of your floors on that day. A warning shows if a party is already booked that day. Use it to see whether the date is realistic.
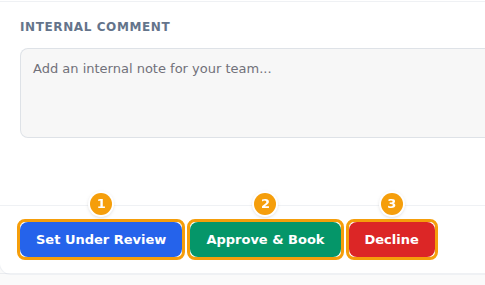
- A new request is Pending. Click Set Under Review (1) to tell your colleagues that you are looking at it. An email goes to the notification address (if the staff email switch is on), and your colleagues get a notice on the bell in Party Management.
- Click Approve & Book (2) when you can host the party, or Decline (3) when you cannot.
- Optional: write an Internal Comment and click Update comment. Only your team sees it.
The status of a request goes from Pending to Under Review and then to Converted (approved and booked) or Declined.
Approve & Book
Approving opens the dialog Convert to Party Booking:
- Choose the Booking Time (1). Clava has the time the guest asked for ready — or 19:00 if the guest chose Flexible.
- Optional: under Floor / Section (2) choose the floor where the party will be. The list shows the floors of this location with their number of seats — you make them under Floors and tables. If the location has no floors yet, this field is not shown. When the guest named a Preferred Space, that floor is already chosen for you (you see it in the request, too) — change it or clear it if the party goes elsewhere.
- Choose the Duration (hours) (3). The default is 3 hours.
- Click Convert (4).
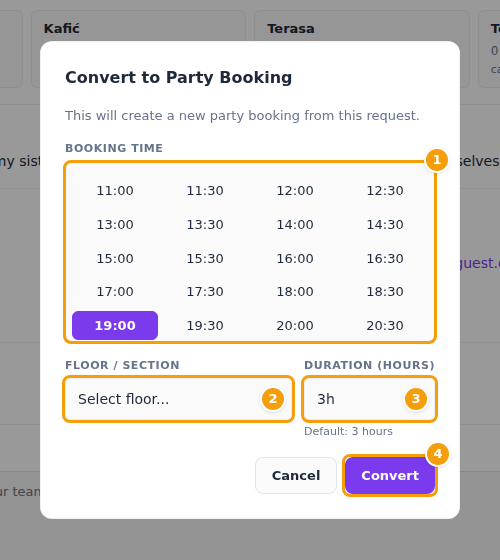
Three things happen: the party appears on your booking calendar at the time you chose (on the floor you picked, if you picked one), it is added to your list of parties and events with the status Requested, and the guest receives the email Good news – your request at (your location) has been approved. Clava checks your plan here. If you already have the most active parties your plan allows, or the party has more guests than your plan allows per party, the dialog tells you and nothing is created.
Decline
Click Decline. A box asks whether to Send a message to the requestor — it is ticked from the start. Type a short note for the guest if you like and click Confirm. If you untick the box, no decline email is sent and the guest hears nothing more.
The switch "Approved event must have associated venue booking"
This switch (3 in the first picture) suggests that you could approve a request without putting it on the booking calendar. At the moment it changes nothing: Approve & Book always creates the calendar booking, whatever the switch says. Leave it as it is.
Good to know
- Nothing is saved until you click Save Party Request Settings. One click saves all six settings together. Changing to another tab does not save them. See Save your work.
- Answer quickly. The guest only gets the automatic received email. A request waits in the list until somebody opens it.
- Checking the form. The website editor's preview does not show the Plan a Party tab. To see what guests see, open your real booking page or the draft preview of your website — see The booking page.
- These requests are private enquiries. Events that you host yourself, with tickets and places, are something else — see Events on your website.
- Only administrators can open Venue Setup. See Roles.