Articles in this topic
The Party Manager
Find a party, then keep everything about it in one place — details, deposit, deadlines, seating plan, guest features, guest list, menus, web page, emails and the sheet for the day.
12 min read
The Party Manager is the list of all your parties and the page of each one. Open Parties in the menu on the left of Party Management; the badge shows how many parties you have.
Find a party
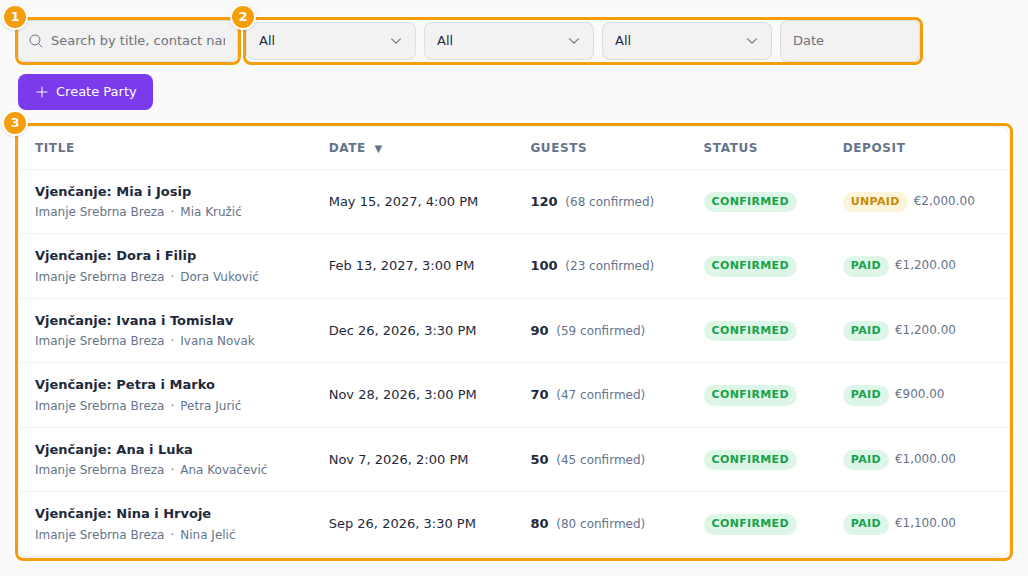
- Type in the search box (1) to find a party by its title, the organiser's name or email.
- Narrow the list with the filters (2): Status, Deposit, Venue and Date. Click Clear date to remove the date filter.
- The list (3) shows the Title with the venue and the organiser, the Date, the Guests (with how many have confirmed), the Status and the Deposit. Click a party to open it.
Create Party above the list starts the wizard. The list shows your client parties only: your own ticketed evenings are under Events (Events) and your event series under Series, each with its own entry in the same menu.
One party
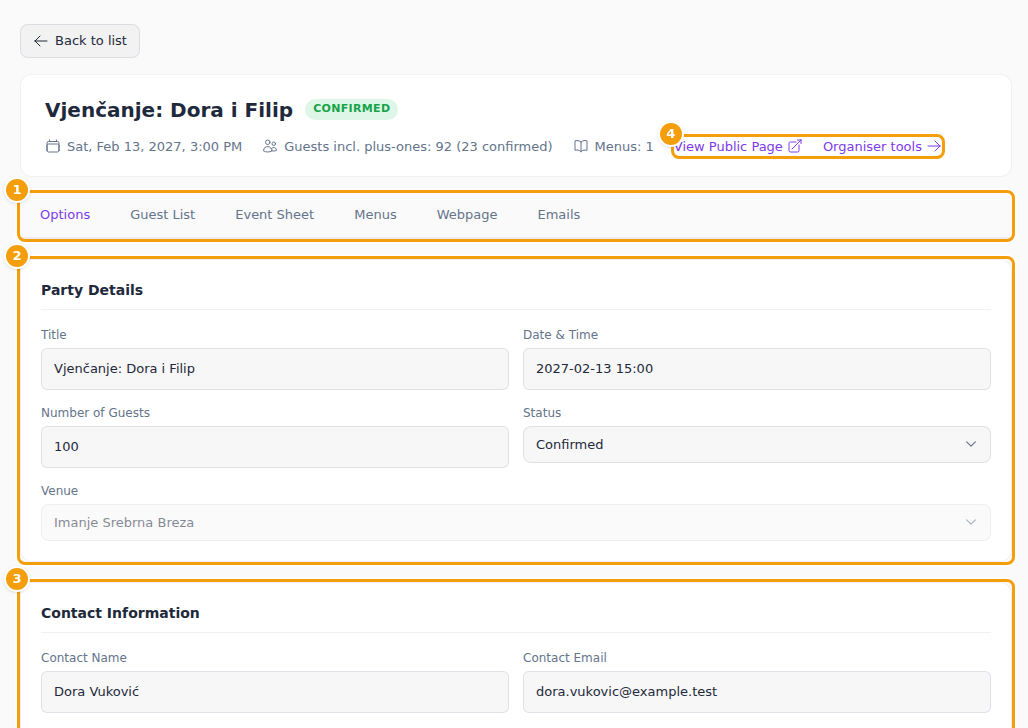
The top of a party shows its title and status (Requested, Confirmed, Cancelled or Locked), the date, Guests incl. plus-ones (with how many have confirmed) and the number of Menus. Two links sit beside them: View Public Page opens the party's website, and Organiser tools is described at the end. Back to list returns to the list.
Six tabs hold the rest: Options, Guest List, Event Sheet, Menus, Webpage and Emails.
Options
The Options tab is a long form in sections. Change what you need, then click Save Changes at the bottom.
Details, contact and deposit
- Party Details: Title, Date & Time, Number of Guests, Status and the Venue (it is fixed once the party exists).
- Contact Information: the organiser's Contact Name, Contact Email, Contact Phone and Notes / Comments.
- Deposit: the Deposit Status (Not Required, Unpaid, Paid or Paid Online) and the Deposit Amount. The list shows it in its Deposit column, so you can see who still owes a deposit.
Public page and invitations
- Public Page: the Party URL (the address of the party's website), the UUID (fixed), and the switches Page Active and RSVP Active.
- Invitation Settings: Invitation Type, Restricted Domain and Payment Method, as in the wizard.
Deadlines
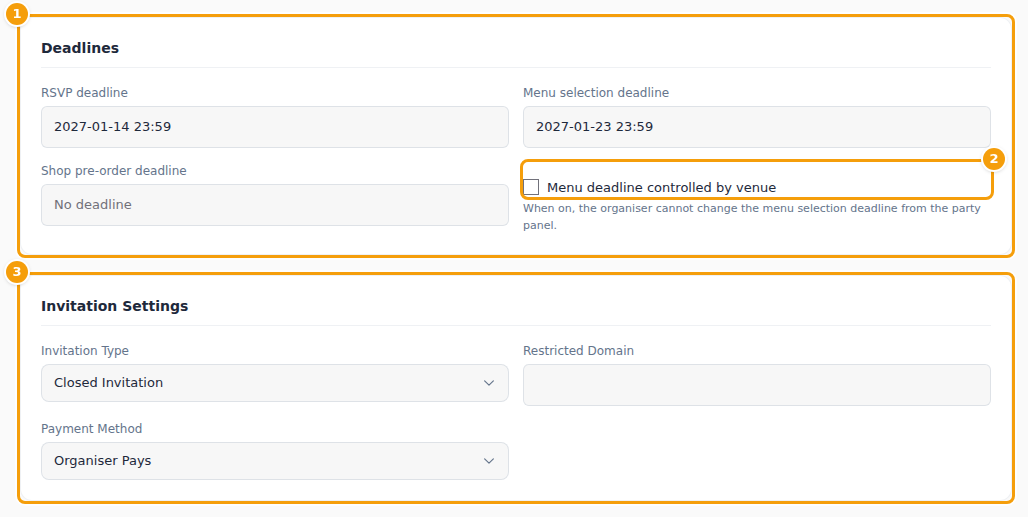
Deadlines (1) are three dates, each with the time of day: the RSVP deadline, the Menu selection deadline and the Shop pre-order deadline. Leave one empty for No deadline. After a deadline passes, guests can no longer answer, choose a menu or order from the shop.
Tick Menu deadline controlled by venue (2) when you want to decide the menu deadline yourself: the organiser then cannot change it from their own area.
Seating plan
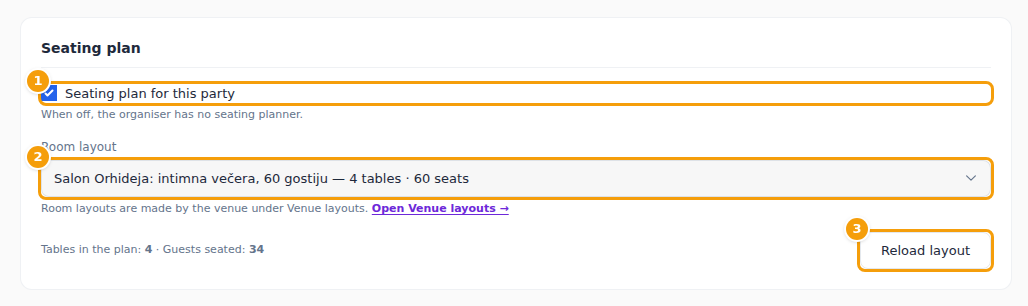
Seating plan for this party (1) gives the organiser the seating planner. When it is off, the organiser has none. With it on, choose the Room layout (2) — one of the layouts you drew under Venue Layouts — and click Save Changes. The party gets its own copy of the layout's tables and items, and the line below shows the Tables in the plan and how many Guests seated there are.
When you change the layout in Venue Layouts afterwards, the party keeps its own copy until you click Reload layout (3) and confirm. The tables are replaced with the layout's current ones; guests stay at tables with the same name, and everyone else goes back to the unseated list. If the venue has no layout yet, a link takes you to Open Venue layouts.
Guest features
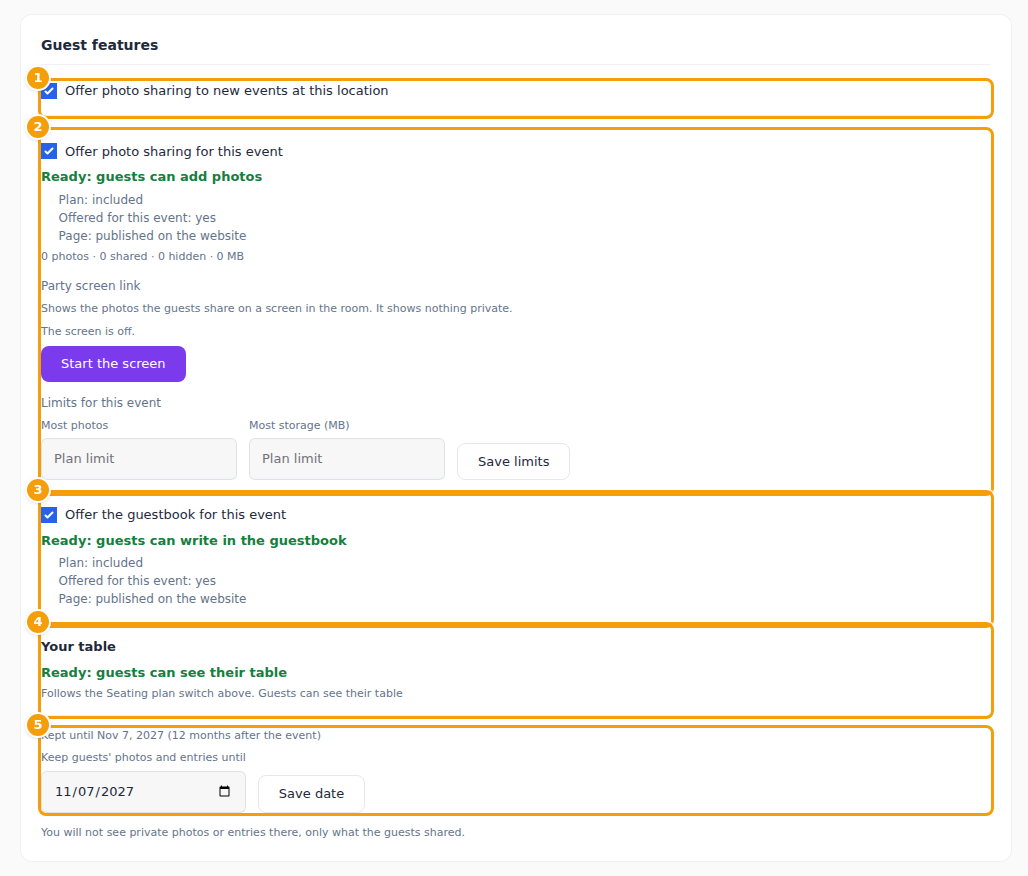
The Guest features card decides what guests may do on the party's website: share photos, write in the guestbook and see their table. How it works for the organiser and the guests is described in Guest photo sharing, Guestbook and Your table.
- Offer photo sharing to new events at this location (1) is the preset for the venue's new parties.
- Offer photo sharing for this event (2) switches photo sharing on for this party. A green line says Ready: guests can add photos, or what is missing: your plan, this switch, or a published page on the party's website. Underneath you see the counts: photos, shared, hidden and the space they use. Two more things belong here. The Party screen link shows the photos guests have shared on a screen in the room: Start the screen gives you a link to open there; it shows nothing private. Switch off stops it, and New link makes the old link stop working. Under Limits for this event you set the Most photos and Most storage (MB) for this party; empty means the limit of your plan. Click Save limits.
- Offer the guestbook for this event (3) works the same way.
- Your table (4) follows the seating plan switch above and says whether guests can see their table yet.
- Photos and guestbook entries are deleted automatically 12 months after the party. Under Keep guests' photos and entries until (5) choose a later date and click Save date. You never see private photos here, only what the guests shared.
Save and welcome email
Save Changes saves the whole tab. Send Welcome Email sends the organiser an email with a link to their own area (after you confirm). Send it when the party is agreed; you can send it again if the organiser loses the email.
Guest List
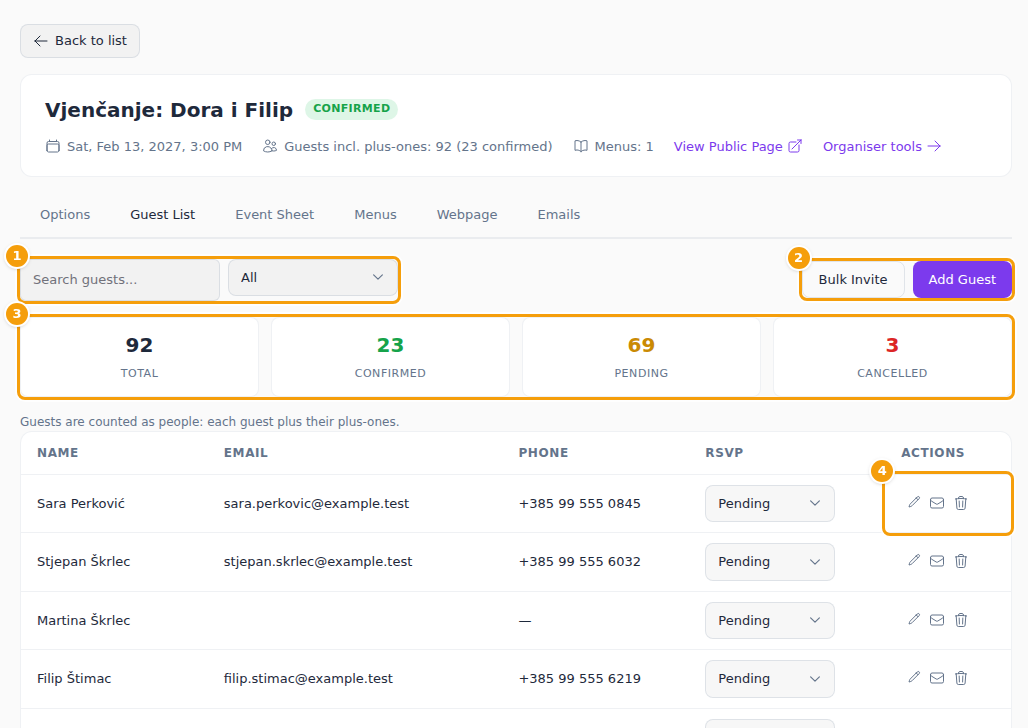
The organiser normally builds the guest list, but you see it too and can change it.
- Search (1) by name and filter by RSVP Status.
- The four counts (3) — Total, Confirmed, Pending and Cancelled — count people, not rows: each guest plus their plus-ones. The same number appears at the top of the party.
- Add Guest (2) opens a form with first and last name, email, phone, RSVP Status, allergens and dietary preferences. Bulk Invite takes many email addresses, one per line or separated by commas, and Send Invitations adds them all.
- In each row (4) you can change the RSVP with the drop-down, Edit the guest, Send Welcome to that guest, or delete them.
Menus
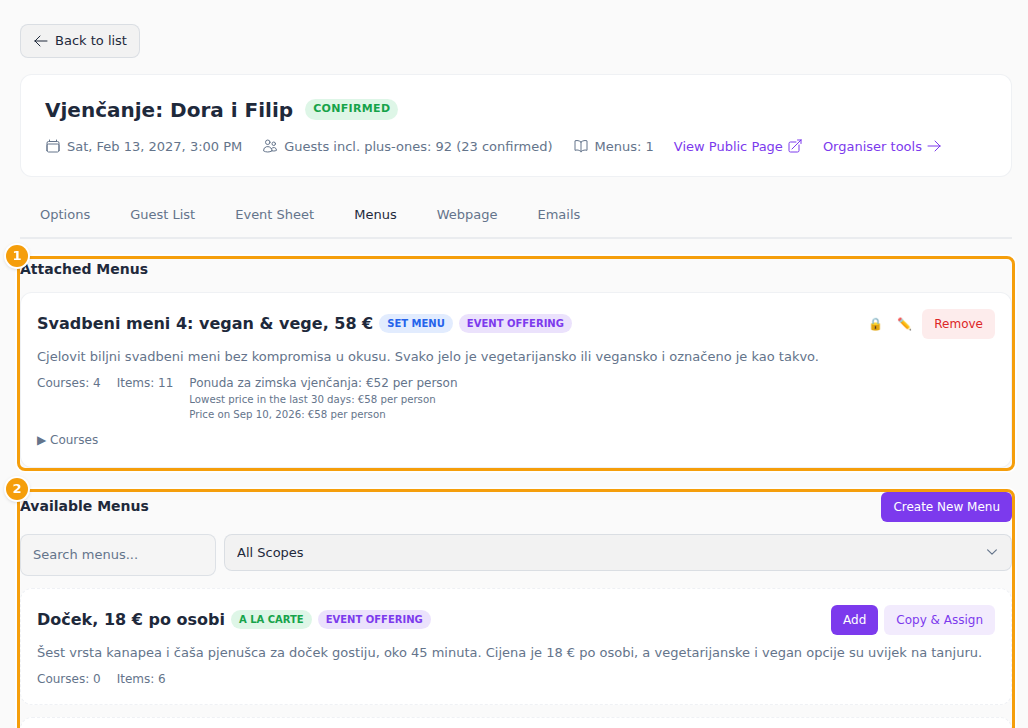
The Menus tab chooses which menus the organiser's guests can pick from. Attached Menus (1) are the ones on this party; Remove takes one off. Under Available Menus (2), search and filter by scope, then click Add to attach a menu. Copy & Assign attaches a copy that you can then change just for this party, and Create New Menu makes a new one. Only menus of the party's venue can be attached. How menus are made is in What menus are for.
Webpage
The Webpage tab is the website builder for this party's own website. Everything works as in the website editor: pages, sections, preview and publishing. A party website has no public page until it is published, and it can be limited to invited guests — see Who sees a page or a section.
Emails
On the Emails tab you add your own words to the emails sent for this party. The text goes into the Welcome
emails — the one to the organiser and the ones to the guests — inside the standard email. Choose the language (HR,
EN or DE), write in the editor — the variables you can use, such as {party_name} and {guest_name}, are
listed above it — and click Save All.
Event Sheet
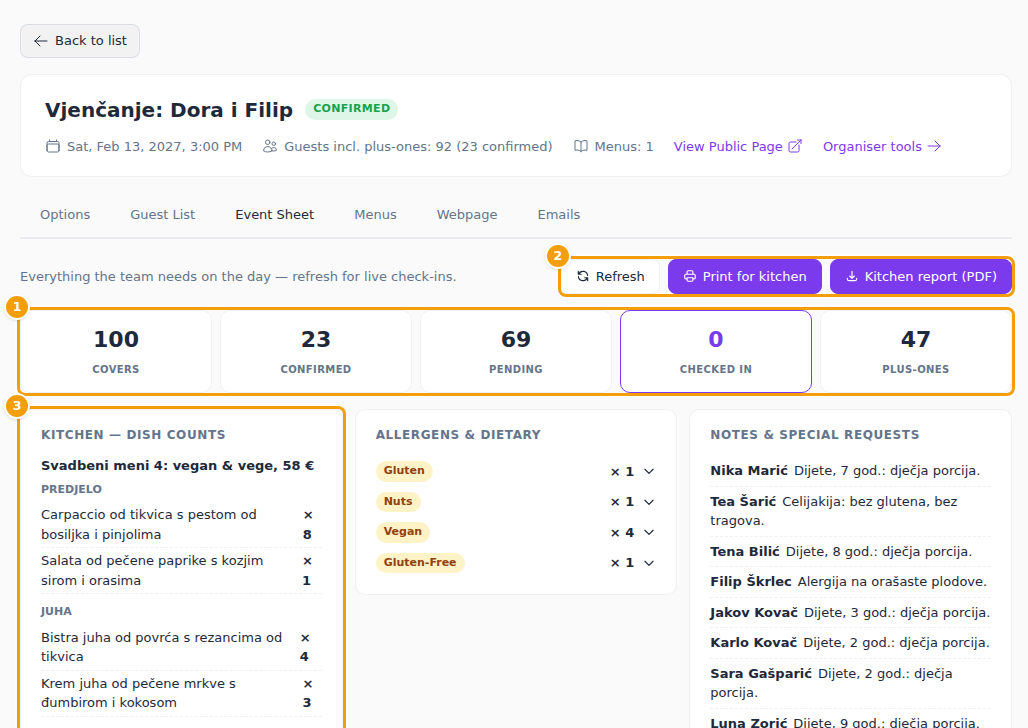
The Event Sheet is everything your team needs on the day, on one page. At the top (1) are Covers, Confirmed, Pending, Checked in and Plus-ones. Below you find the Kitchen — dish counts (3) for the chosen menus, the Allergens & dietary of the guests, their Notes & special requests, the organiser's details with the deposit, the guests' answers to the organiser's questions, and a per-guest Kitchen report.
The buttons (2): Refresh loads the latest numbers, for example live check-ins; Print for kitchen prints the page; Kitchen report (PDF) downloads the per-guest report as a file.
Organiser tools
Organiser tools in the header opens the party's own area — the one the organiser uses — signed in as the organiser. You see what they see: guest list, menus, seating, questions and shop. It is the quickest way to help an organiser who is stuck or to set things up for them. You do not see guests' private photos or guestbook entries there, only what has been shared.