Articles in this topic
Create a menu
Make a new menu in a minute — name, location, set menu or à la carte, price and where it appears — then copy or delete menus when you need to.
6 min read
A new menu takes a minute: you give it a name, choose the location, choose whether it is a set menu or à la carte, and say where it should appear. The courses and dishes come afterwards — see Courses and dishes.
Create a new menu
- In the menu on the left, under Venue Content, click Menus, then click New Menu (top right).
- Fill in the window that opens. The fields are explained in the picture and below.
- Click Save. A green message, Menu created., confirms it and the new menu opens in the editor.
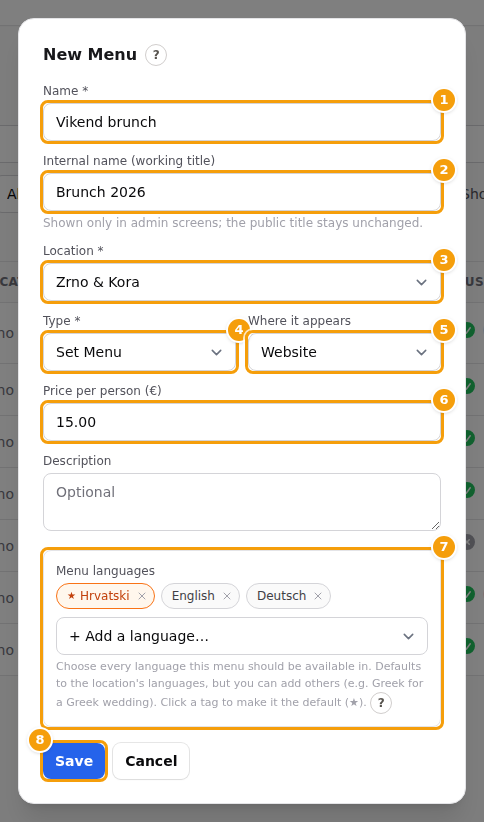
- (1) Name — the name your guests read. Required.
- (2) Internal name (working title) — optional, a name for you and your team. See Name and working title.
- (3) Location — the location the menu belongs to. Required. Choose it before you look at the price: the price box shows the currency of this location.
- (4) Type — Set Menu or À La Carte. See Set menu or à la carte?.
- (5) Where it appears — Website or Event Offering. See Where will the menu appear?.
- (6) Price per person — only for a set menu. Leave it empty if you don't want to show a price.
- (7) Menu languages — the languages of this menu. Choosing the Location fills them in from the languages of that location; most of the time you leave them as they are. See Menus in several languages.
- (8) Save creates the menu. Cancel closes the window and creates nothing.
The box Description is optional too. Its text is shown under the name of the menu on your website.
If Name or Location is empty, a red message says Name and location are required. and nothing is created.
Good to know
If your plan has a limit on menus and you have reached it, New Menu does not open the window. A message says You have reached the limit for this feature on your current plan. — see Menus and your plan.
Name and working title
A menu can have two names:
- Name is public. Guests read it on your website and on the event request form.
- Internal name (working title) is only for you. It is shown in the list and in the editor, and Name is shown in grey underneath. The window says it itself: Shown only in admin screens; the public title stays unchanged.
A working title helps when you have several menus with similar names — for example the public name Daily menu and the working title Weekday lunch, spring 2026. You can add or change it later with Edit.
Set menu or à la carte?
| Set Menu | À La Carte | |
|---|---|---|
| What it is | A fixed menu: starter, main course, dessert — one price for the whole menu | A list of dishes, each with its own price |
| Price | Price per person for the whole menu | No menu price; every dish has its own price |
| Courses | The courses are the heart of the menu | Optional: use them as headings, such as Breakfast and Lunch, or add dishes without a course |
| At an event | Guests choose one dish from each course | — |
You can change the type later: click Edit, change Type and click Save Changes. A menu that becomes À La Carte loses its menu price when you save.
Where will the menu appear?
Where it appears decides who can use the menu. In the list it is a column and a filter (Anywhere shows all).
| Where it appears | Meaning |
|---|---|
| Website | Shown in the Menu section of your website — if it is switched on and inside its dates (see Where a menu appears). |
| Event Offering | Offered for events. Guests can pick it on the event request form if you switched on menu selection (Let guests pick a menu), and your team can add it to an event. It is not shown on your website. |
| Event Specific | A menu made for one single event, created from inside that event by your team. You cannot choose this one in the New Menu window. These menus appear in the list, and their Where it appears cannot be changed. They do not count towards your plan's menus. |
You can change Where it appears later with Edit.
What happens right after you save
The new menu is Active at once. If it appears on the Website and the Menu section of your website shows all your menus, the empty menu is on your website already — with just its name and price.
So if you want to build the menu in peace:
- Open More (top right of the editor) and click Deactivate.
- Fill in the courses and dishes.
- Open More again and click Activate when you are ready.
Good to know
If the Menu section of your website has particular menus ticked in its Select Menus list, a new menu does not appear there until you tick it. See Add a section.
Copy an existing menu
A copy saves you typing — for a second location, or for a new season that is almost the same.
- Open the menu and click More, then Duplicate.
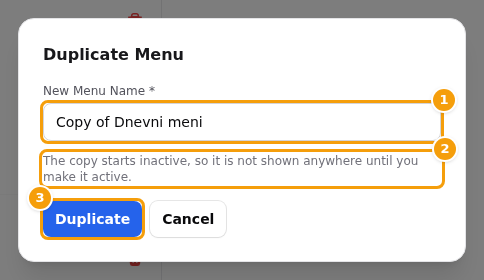
- In the window Duplicate Menu, check the New Menu Name. It starts with Copy of and the old name. Under it the window tells you what to expect: The copy starts inactive, so it is not shown anywhere until you make it active.
- Click Duplicate. Menu duplicated. appears and the copy opens.
What is copied: the courses and dishes with their prices, allergens and translations, the languages, the type, where it appears, the location and the dates. The working title is not copied.
What is different in the copy:
- It starts Inactive, whatever the status of the original. Guests do not see it — not on your website, not on the event request form — until you make it active.
- It starts unlocked, even if the original is locked.
- A copy of an Event Specific menu becomes an Event Offering menu.
Tip
When the copy is ready, open it and click More → Activate (see Switch a menu on or off). For a different location, open the copy, click Edit and change the Location first.
A copy counts towards your plan's menus like any other menu. At the limit, Duplicate does not go ahead and shows You have reached the limit for this feature on your current plan. — see Menus and your plan.
Delete a menu
- Open the menu and click More, then Delete.
- A window Confirm deletion asks Delete this menu and all its courses and items? Click Delete.
- Menu deleted. appears and you are back in the list.
The menu disappears from your website, from the event request form and from the events it was added to. This cannot be undone from Clava. A locked menu cannot be deleted — unlock it first (Lock a menu).
Tip
Not sure? Switch the menu off or archive it instead. It stays in Clava and you can bring it back — see Status and dates. An archived menu does not count towards your plan's menus.