Articles in this topic
Tickets
Set up ticket types with prices, quantities and sales windows, run a free registration, use the waiting list and extras, let guests choose a table, and see what guests go through when they reserve.
9 min read
How guests get a place is decided in the Guests section of the event form, and afterwards on the Tickets tab of the event (Places for a free event). Guests do not pay online: they reserve, and they pay at the venue.
Tickets or free registration
- Free registration: guests sign up and you see who is coming. There is no price and no ticket type; you set how many places there are (the Number of guests of the event) and Max places per registration. Guests who sign up still get a confirmation with a QR code.
- Tickets: guests reserve one or more ticket types, each with a price. The total is shown on the form, and they pay at the venue.
You choose when you create the event, and you can look at it again on the event's Overview tab, under Guests.
Ticket types
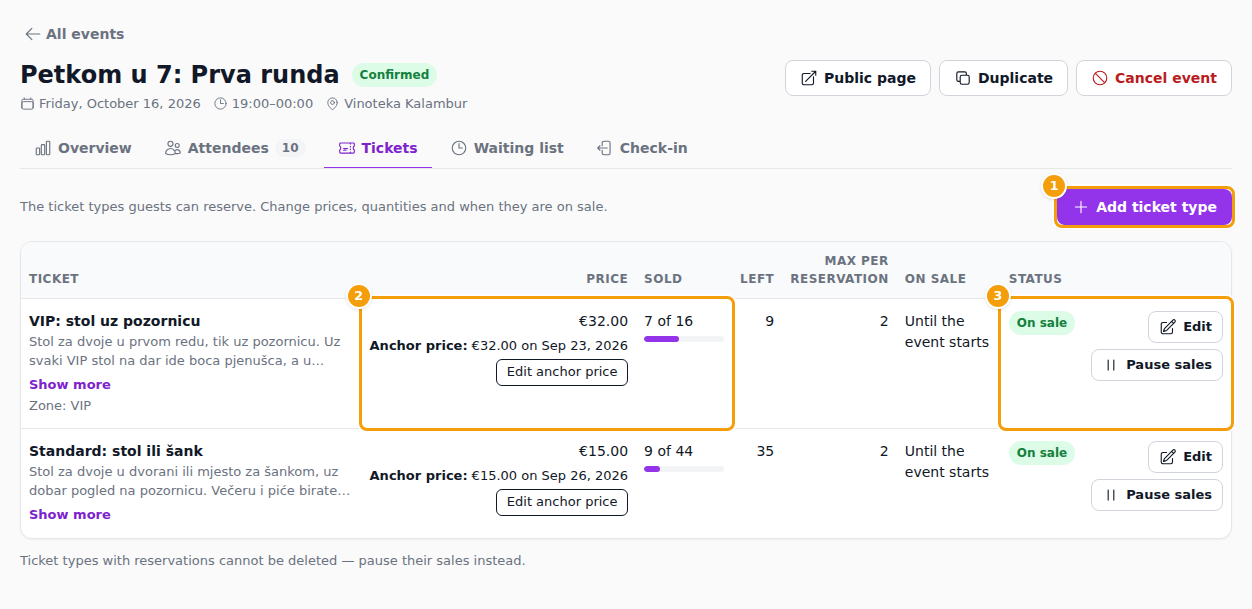
Open the event and click Tickets. The list shows each ticket type with its Price, how many are Sold and how many are Left, the Max per reservation, when it is On sale and its Status. Click Add ticket type (1) for another one, or use Edit in a row (3).
A ticket type has:
| Field | What it does |
|---|---|
| Ticket name | What guests see, for example Standard, Early bird or Deposit. |
| Price | The price per person. Enter 0 for free. |
| Quantity | How many of this type you sell. Leave it empty to sell up to the event's number of guests. |
| Max per reservation | The most places one reservation may hold. |
| Description | A line guests read, for example Includes a glass of sparkling wine. |
| Who can buy | Only on a meetup of an event series: Everyone who can book the meetup or Members only. |
| Sales start / Sales end | When this type is on sale. Empty start: on sale right away. Empty end: until the event starts. Sales must end after they start. |
In the event form, the last three fields are under More options.
Some things to know:
- The price can be a deposit. Call the ticket Deposit and set the amount; guests pay it at the venue, and you mark it as paid under Attendees.
- The total number of places is the event's Number of guests. A ticket type's Quantity cannot be lowered below the places already reserved.
- A new price applies to new reservations only.
- Pause sales stops a ticket type from being sold; Resume sales starts it again. A ticket type that nobody has reserved can be deleted with Delete. One that has reservations cannot: pause it instead.
- For a location in Croatia, each ticket also shows its Anchor price — the regular price on the reference day, which Croatian rules ask you to show next to the price. Edit anchor price corrects it, and the reason you give is saved with your name. See Anchor prices.
Free registration
For a free event, the tab is called Places: it shows how many places there are. To change the number, click Edit on the Overview tab and change Number of guests; Max places per registration is there too.
The waiting list
With the Waiting list switch on (it is on from the start), a sold-out event shows guests Join the waiting list instead of a reservation form. They leave their contact details. When a place frees up, you give it to someone on the Waiting list tab — see Attendees and check-in. On a meetup of a series the list can also fill itself: the next member in line gets the place, see The waiting list of a meetup. The tab only appears while the switch is on. Switch it on or off with Edit on the Overview tab.
Extras
With Extras switched on, guests with a reservation can pre-order extras from their confirmation page, such as a wine pairing or a bottle for the table; they pay at the venue. You add the extras themselves under Extras & more tools on the event's Overview tab.
Other switches
- Show on your website: the event appears in the event lists of your website and has its own page there. See Events on your website.
- Guests can cancel: guests can cancel an unpaid reservation themselves from their confirmation, so the place goes to someone else.
Table choice
When an event has a Seating plan with tables (see Venue layouts), guests can choose where they sit. The Table choice setting has three values:
- Guests do not choose a table — you seat them yourself.
- Guests can choose a table — they may pick one or leave it to you.
- Guests must choose a table — the form needs a table before it can be sent.
The reservation form then shows a plan of the room with a list of tables. A table shows how many seats are still free. Seats are counted one by one: a table for two can take two reservations of one place each. A guest who reserves again with the same email address has to book the extra places at the same table.
VIP and other zones
You can reserve some tables for one kind of ticket. Give those tables a zone in the layout, for example VIP — see Zones. Then open the ticket type and choose that zone under Seating zone:
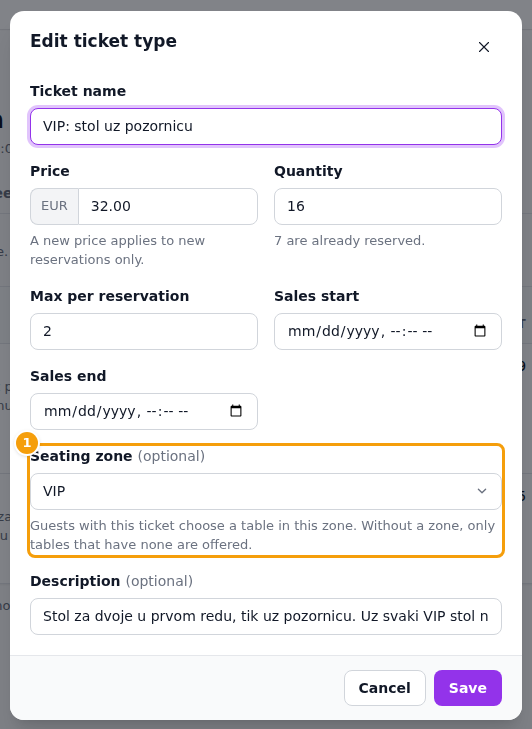
Guests with a VIP ticket can then choose only VIP tables, and tables with a zone are not offered to other tickets. A ticket without a zone gets the tables that have no zone. When you add an attendee yourself, you may seat them outside the ticket's zone.
The seating plan cannot be changed once guests have reserved tables in it; cancel those reservations first. Table choice also needs a plan with at least one table that has seats.
What guests see
- On the event's page they see the tickets with their prices, how many places are left and the limit per reservation, for example Up to 2 per reservation. Before Sales start the page says Reservations open on the date, and after Sales end Reservations are closed.
- They click Reserve (Register for a free event) and fill in the number of places, their name, email and, if they like, phone number. If table choice is on, they choose a table. The form shows the total and Nothing to pay now — you pay at the venue.
- They click Reserve places. They get a confirmation on screen and by email, with a page My reservation: the reference, the date and place, a QR code for every person to show at the door, Add to calendar and, if you allow it, Cancel reservation.
A cancelled event shows This event has been cancelled instead of tickets.